The Kaptain on … stuff

04 Dec, 2011

Five Cool Things You Can Do With Groovy Scripts

Posted by: TheKaptain In: Development

1. Ensure all of your Jenkins builds are building the correct branch from source control

I manage a large number of builds at work, spread across several build servers. When we release a new version all of the builds need to be updated to point to new working branches. This script takes advantage of the fact that our branches all end in the version number to quickly check that all of the last builds were on the expected version.
Using the Jenkins API is very easy and the new capabilities of Groovy introduced by JSONSlurper make it easier than ever to consume.

2. Look up the artifacts from the last successful Jenkins build

This is very handy if you want to automate deployment of software from your build system and can replace a lot of error prone manual updating of scripts. In this particular example you can link up quickly with the latest, greatest build of JRuby from their public CI server.

Here’s the sample output at time of writing:

[relativePath:dist/jruby-bin-1.7.0.dev.tar.gz, fileName:jruby-bin-1.7.0.dev.tar.gz, displayPath:null]
[relativePath:dist/jruby-bin-1.7.0.dev.tar.gz.md5, fileName:jruby-bin-1.7.0.dev.tar.gz.md5, displayPath:null]
[relativePath:dist/jruby-bin-1.7.0.dev.tar.gz.sha1, fileName:jruby-bin-1.7.0.dev.tar.gz.sha1, displayPath:null]
[relativePath:dist/jruby-bin-1.7.0.dev.zip, fileName:jruby-bin-1.7.0.dev.zip, displayPath:null]
[relativePath:dist/jruby-bin-1.7.0.dev.zip.md5, fileName:jruby-bin-1.7.0.dev.zip.md5, displayPath:null]
[relativePath:dist/jruby-bin-1.7.0.dev.zip.sha1, fileName:jruby-bin-1.7.0.dev.zip.sha1, displayPath:null]
[relativePath:dist/jruby-complete-1.7.0.dev.jar, fileName:jruby-complete-1.7.0.dev.jar, displayPath:null]
[relativePath:dist/jruby-complete-1.7.0.dev.jar.md5, fileName:jruby-complete-1.7.0.dev.jar.md5, displayPath:null]
[relativePath:dist/jruby-complete-1.7.0.dev.jar.sha1, fileName:jruby-complete-1.7.0.dev.jar.sha1, displayPath:null]
[relativePath:dist/jruby-jars-1.7.0.dev.gem, fileName:jruby-jars-1.7.0.dev.gem, displayPath:null]
[relativePath:dist/jruby-jars-1.7.0.dev.gem.md5, fileName:jruby-jars-1.7.0.dev.gem.md5, displayPath:null]
[relativePath:dist/jruby-jars-1.7.0.dev.gem.sha1, fileName:jruby-jars-1.7.0.dev.gem.sha1, displayPath:null]
[relativePath:dist/jruby-src-1.7.0.dev.tar.gz, fileName:jruby-src-1.7.0.dev.tar.gz, displayPath:null]
[relativePath:dist/jruby-src-1.7.0.dev.tar.gz.md5, fileName:jruby-src-1.7.0.dev.tar.gz.md5, displayPath:null]
[relativePath:dist/jruby-src-1.7.0.dev.tar.gz.sha1, fileName:jruby-src-1.7.0.dev.tar.gz.sha1, displayPath:null]
[relativePath:dist/jruby-src-1.7.0.dev.zip, fileName:jruby-src-1.7.0.dev.zip, displayPath:null]
[relativePath:dist/jruby-src-1.7.0.dev.zip.md5, fileName:jruby-src-1.7.0.dev.zip.md5, displayPath:null]
[relativePath:dist/jruby-src-1.7.0.dev.zip.sha1, fileName:jruby-src-1.7.0.dev.zip.sha1, displayPath:null]

3. Read in a CSV file, filter it, and write out the result

Groovy Grapes and one of my favorite libraries, OpenCSV, make it trivial to script ‘one off’ solutions for removing work that would normally take place manually in Excel. For me it comes up most often with data import/export from systems I’m working on and the need to create particular test environments using those import/export mechanisms. For example, using a scripted solution like this you can quickly:

  • Export users from one test system into a CSV file, along with local phone number contact data
  • Replace the existing phone numbers with a mix of local and international numbers
  • Import the new data into a different test system
  • Verify that the system properly deals with international calling concerns

This example simply trims out all of the rows where the second column of input contains values less than 100. It’s also nice to note that OpenCSV is smart enough to let you ignore one or more ‘header rows’, a common attribute of CSV files.

4. Download, install and run a stand-alone webserver

This example comes courtesy of a recent article by Andrew Glover about Gretty, a lightweight http server. I don’t have a concrete use-case for this right now, but it’s easy to note that in this case you can code a large part of the server behaviour directly in the script, unlike, for instance, if you were to use a script to stand up a Jetty server. This should let you publish a script once in a central location and stand up as many Gretty servers providing the declared services as you like. This particular example simply echos back ‘Hello’ plus whatever path you append to localhost:8080.

5. Remotely execute any of these scripts by url

As of Groovy 1.8.3/1.9-beta-4 you can refer to a Groovy script hosted at a remote url and execute it locally. If you work on different machines a lot(as I do) this can really help keep your toolbox of scripts handy, regardless of where you are. Since these scripts are publicly hosted on GitHub(thanks guys!), you can simply copy the url from the ‘view raw’ link at the bottom and go to your console to execute them like this:

[groovy language=”true”]
$ groovy https://gist.github.com/raw/1430856/cea0186a862217015fb4fc2b63eb0ad3575c06fc/jenkinsBuildArtifacts.groovy
{
"actions": [
{
"causes": [
{
"shortDescription": "Started by timer"
}
]
},
{
"buildsByBranchName": {
"origin/master": {
"buildNumber": 684,
"buildResult": null,
"revision": {
"SHA1": "3419fee4bb9436d3222ff3df8dd7fcf2308a6919",
"branch": [
{
"SHA1": "3419fee4bb9436d3222ff3df8dd7fcf2308a6919",
"name": "origin/master"
}
]
}
}
},
… and so on
[/groovy]

Final note

Being able to share scripts across a variety of machines has definitely made my professional life a lot easier and I’m very glad to see the ability to execute code from a URL in Groovy. But what really turned me onto the idea was its usage in Gradle, which supports loading remote Groovy/Gradle scripts using the “apply from: {url or file}” syntax. I find that more and more I reference particular tasks remotely in a build, especially for static analysis tools that don’t necessarily need to be run on a regular basis.
A great example of this is the recently released Gradle Templates Plugin, which is basically the Gradle answer to the Maven Archetype plugin. Create a build.gradle with the following content:

[groovy language=”true”]
apply from: ‘http://launchpad.net/gradle-templates/trunk/1.2/+download/apply.groovy’
[/groovy]

And we have the following tasks available to create new Gradle projects and objects with conventional structure:

[groovy language=”true”]
Template tasks
————–
createGradlePlugin – Creates a new Gradle Plugin project in a new directory named after your project.
createGroovyClass – Creates a new Groovy class in the current project.
createGroovyProject – Creates a new Gradle Groovy project in a new directory named after your project.
createJavaClass – Creates a new Java class in the current project.
createJavaProject – Creates a new Gradle Java project in a new directory named after your project.
createScalaClass – Creates a new Scala class in the current project.
createScalaObject – Creates a new Scala object in the current project.
createScalaProject – Creates a new Gradle Scala project in a new directory named after your project.
createWebappProject – Creates a new Gradle Webapp project in a new directory named after your project.
exportAllTemplates – Exports all the default template files into the current directory.
exportGroovyTemplates – Exports the default groovy template files into the current directory.
exportJavaTemplates – Exports the default java template files into the current directory.
exportPluginTemplates – Exports the default plugin template files into the current directory.
exportScalaTemplates – Exports the default scala template files into the current directory.
exportWebappTemplates – Exports the default webapp template files into the current directory.
initGradlePlugin – Initializes a new Gradle Plugin project in the current directory.
initGroovyProject – Initializes a new Gradle Groovy project in the current directory.
initJavaProject – Initializes a new Gradle Java project in the current directory.
initScalaProject – Initializes a new Gradle Scala project in the current directory.
initWebappProject – Initializes a new Gradle Webapp project in the current directory.
[/groovy]

18 Sep, 2011

Using Gradle to Bootstrap your Legacy Ant Builds

Posted by: TheKaptain In: Development

Gradle provides several different ways to leverage your existing investment in Ant, both in terms of accumulated knowledge and the time you’ve already put into build files. This can greatly facilitate the process of porting Ant built projects over to Gradle, and can give you a path for incrementally doing so. The Gradle documentation does a good job of describing how you can use Ant in your Gradle build script, but here’s a quick overview and some particulars I’ve run into myself.

Gradle AntBuilder

Every Gradle Project includes an AntBuilder instance, making any and all of the facilities of Ant available within your build files. Gradle provides a simple extension to the existing Groovy AntBuilder which adds a simple yet powerful way to interface with existing Ant build files: the importBuild(Object antBuildFile) method. Internally this method utilizes an Ant ProjectHelper to parse the specified Ant build file and then wraps all of the targets in Gradle tasks making them available in the Gradle build. The following is a simple Ant build file used for illustration which contains some properties and a couple of dependent targets.
[xml language=”true”]
<?xml version="1.0"?>
<project name="build" default="all">
<echo>Building ${ant.file}</echo>

<property file="build.properties"/>
<property name="root.dir" location="."/>

<target name="dist" description="Build the distribution">
<property name="dist.dir" location="dist"/>
<echo>dist.dir=${dist.dir}, foo=${foo}</echo>
</target>

<target name="all" description="Build everything" depends="dist"/>
</project>

[/xml]

Importing this build file using Gradle is a one-liner.

[groovy language=”true”]
ant.importBuild(‘src/main/resources/build.xml’)
[/groovy]

And the output of gradle tasks –all on the command line shows that the targets have been added to the build tasks.

[groovy language=”true”]
$ gradle tasks –all

Other tasks
———–
all – Build everything
dist – Build the distribution

[/groovy]

Properties used in the Ant build file can be specified in the Gradle build or on the command line and, unlike the usual Ant property behaviour, properties set by Ant or on the command line may be overwritten by Gradle. Given a simple build.properties file with foo=bar as the single entry, here’s a few combinations to demonstrate the override behaviour.
[table id=6 /]

How to deal with task name clashes

Since Gradle insists on uniqueness of task names attempting to import an Ant build that contains a target with the same name as an existing Gradle task will fail. The most common clash I’ve encountered is with the clean task provided by the Gradle BasePlugin. With the help of a little bit of indirection we can still import and use any clashing targets by utilizing the GradleBuild task to bootstrap an Ant build import in an isolated Gradle project. Let’s add a new task to the mix in the Ant build imported and another dependency on the ant clean target to the all task.

[xml language=”true”]
<!– excerpt from buildWithClean.xml Ant build file –>
<target name="clean" description="clean up">
<echo>Called clean task in ant build with foo = ${foo}</echo>
</target>
<target name="all" description="Build everything" depends="dist,clean"/>
[/xml]

And a simple Gradle build file which will handle the import.
[groovy language=”true”]
ant.importBuild(‘src/main/resources/buildWithClean.xml’)
[/groovy]

Finally, in our main gradle build file we add a task to run the targets we want.
[groovy language=”true”]
task importTaskWithExistingName(type: GradleBuild) { GradleBuild antBuild ->
antBuild.buildFile =’buildWithClean.gradle’
antBuild.tasks = [‘all’]
}
[/groovy]

This works, but unfortunately suffers from one small problem. When Gradle is importing these tasks it doesn’t properly respect the declared order of the dependencies. Instead it executes the dependent ant targets in alphabetical order. In this particular case Ant expects to execute the dist target before clean and Gradle executes them in the reverse order. This can be worked around by explicitly stating the task order, definitely not ideal, but workable. This Gradle task will execute the underlying Ant targets in the way we need.
[groovy language=”true”]
task importTasksRunInOrder(type: GradleBuild) { GradleBuild antBuild ->
antBuild.buildFile =’buildWithClean.gradle’
antBuild.tasks = [‘dist’, ‘clean’]
}
[/groovy]

Gradle Rules for the rest

Finally, you can use a Gradle Rule to allow for calling any arbitrary target in a GradleBuild bootstrapped import.
[groovy language=”true”]
tasks.addRule("Pattern: a-<target> will execute a single <target> in the ant build") { String taskName ->
if (taskName.startsWith("a-")) {
task(taskName, type: GradleBuild) {
buildFile = ‘buildWithClean.gradle’
tasks = [taskName – ‘a-‘]
}
}
}
[/groovy]
In this particular example, this can allow you to string together calls as well, but be warned that they execute in completely segregated environments.
[groovy language=”true”]
$ gradle a-dist a-clean
[/groovy]

Source code

All of code referenced in this article is available on github if you’d like to take a closer look.

03 Apr, 2011

A Groovy/Gradle JSLint Plugin

Posted by: TheKaptain In: Development

This article originally appeared in the January 2011 issue of GroovyMag.

Gradle is a build system in which builds are described using a declarative and concise DSL written in the Groovy language. This article describes how you can wrap proven Apache Ant Tasks in a Gradle Plugin to make using them as effortless as possible. We’ll also go over some of the tools Gradle provides for building and testing robust Plugin functionality following some easy patterns.

Creating new custom Plugins for Gradle is a relatively straightforward and easy process. Within a Plugin it’s possible to configure a Gradle Project with new properties, dependencies, Tasks – pretty much anything that you can configure in a build.gradle file can be encapsulated into a Plugin for abstraction, portability and reuse. One of the easier ways to add functionality through a Plugin is to encapsulate an existing Ant Task and enhance it by providing the ease-of-use and configuration that Gradle users have come to expect. Recently, I’ve been writing a lot more JavaScript and was looking for static analysis tools to help guide me away from ‘bad habits’. The popular choice for static analysis of JavaScript code seems to be JSLint, so here’s an example of providing that functionality for a Gradle build by wrapping an existing JSLint task and making it easier to work with.

Anatomy of a Gradle Plugin

Gradle plugins can most easily be built using Gradle itself. There is a conveniently available gradleApi() method you can call to include the required framework classes, demonstrated in the dependencies section of a build.gradle file shown in Listing 1. For this example we’re also using the Groovy Plugin and JUnit for testing, so we will include those dependencies as well.

[groovy language=”true”]
dependencies {
compile gradleApi()
groovy group: ‘org.codehaus.groovy’, name: ‘groovy’, version: ‘1.7.6’
testCompile group: ‘junit’, name: ‘junit’, version: ‘4.8.2
}

[/groovy]

Listing 1: The dependencies portion of a build.gradle file for building our Plugin

Creating a new Gradle Plugin is a simple matter of implementing the Gradle interface and its single required method, the skeleton of which is shown in Listing 2. Within the apply method, the Plugin can configure the Project to add Tasks or properties as needed.

[groovy language=”true”]
class JSLintPlugin implements Plugin<Project>
{
void apply(Project project)
{
//configure the Project here
}
}
[/groovy]

Listing 2: Skeleton of the Plugin implementation

Integrating with Ant

I’ve never been overly fond of Ant, mostly due to the extremely verbose and repetitive nature of the xml declaration. But the fact remains that Ant has been a primary and well-used build tool for years, and the Tasks written for it have been tried and tested by many developers. The Groovy AntBuilder, in combination with the facilities Gradle provides for dependency resolution and classpath management, makes it very easy to incorporate existing Ant functionality into a build and abstract most of the details away from the end user. For this plugin, we add the library containing the Ant Task to a custom configuration so that we can have it automatically downloaded and easily resolve the classpath.
Listing 3 shows how the configuration for the JSLint4Java Task could appear in an Ant build.xml file. Note that you’re on your own here to provide the required library for the classpath.

[xml language=”true”]
<taskdef name="jslint"
classname="com.googlecode.jslint4java.ant.JSLintTask"
classpath="/path/to/jslint4java-1.4.jar"/>
<target name="jslint">
<jslint options="undef,white" haltOnFailure="false">
<formatter type="xml" destfile="${build.dir}/reports"/>
<fileset dir="." includes="**/*.js" excludes="**/server/"/>
</jslint>
</target>
[/xml]

Listing 3: Configuring the Ant target in a build.xml file

Gradle makes it easy to separate the configuration and execution phases of the build, allowing for a Plugin to add an Ant Task to the Gradle Project and expose the (optional) configuration in a build script. In addition, Gradle encourages a pattern of providing a ‘convention’ object alongside of a Plugin to clearly separate the concerns.
Listing 4 demonstrates some code from the Plugin implementation that adds a ‘jslint’ Task to a Gradle Project, setting the specific options based on a convention object. Note how we extract the classpath using the notation project.configurations.jslint.asPath.

[groovy language=”true”]
private static final String TASK_NAME = ‘jslint’
private Project project
private JSLintPluginConvention jsLintpluginConvention

// some of the code in the apply method
this.jsLintpluginConvention = new JSLintPluginConvention(project)
project.convention.plugins.jslint = jsLintpluginConvention
project.task(TASK_NAME) << {
project.file(project.reportsDir).mkdirs()
logger.info("Running jslint on project ${project.name}")
ant.taskdef(name: TASK_NAME, classname: jsLintpluginConvention.taskName,
classpath: project.configurations.jslint.asPath)
ant."$TASK_NAME"(jsLintpluginConvention.mapTaskProperties()) {
formatter(type: jsLintpluginConvention.decideFormat(),
destfile: jsLintpluginConvention.createOutputFileName())
jsLintpluginConvention.inputDirs.each { dirName ->
fileset(dir: dirName,
includes: jsLintpluginConvention.includes,
excludes: jsLintpluginConvention.excludes)
}
}
}
[/groovy]
Listing 4: Adding a jslint Task to a Gradle Project

If you’re not already familiar with the Gradle syntax for creating new Tasks inline, the project.task(String taskName) method is called to instantiate a new Task, and the ‘< <' syntax is used to to push the Task activities into the 'doLast' Task lifecycle phase. Allowing for configuration of the Task in a build script is as simple as exposing a method named the same as the Task that takes in a Closure parameter and applies that Closure to set properties on the convention object, as shown in Listing 5. [groovy language="true"] /** * Perform custom configuration of the plugin using the provided closure. * @param closure */ def jslint(Closure closure) { closure.delegate = this closure() } [/groovy] Listing 5: A method to allow for configuration of the jslint Task from a build script

The simple use-case

As per usual when working with Gradle, using this plugin in the most basic case requires only these things:

  • Declare a dependency on the Plugin source. This can be either a released jar to be downloaded from a repository by Gradle or you can download a jar manually from pretty much anywhere and add it to the classpath directly.
  • Apply the Plugin to a Gradle build.
  • Call the jslint Task as part of the build.

The entire configuration and usage looks something like Listing 6, assuming that the gradle-jslint-plugin jar is found in /usr/home/gradlelibs.

[groovy language=”true”]
/* In a build.gradle file */
buildscript {
dependencies {
classpath fileTree(dir: ‘/usr/home/gradlelibs’, include: ‘*.jar’)
}
}
apply plugin: org.kar.jslint.gradle.plugin.JSLintPlugin

/* and on the command line… */
gradle jslint
[/groovy]
Listing 6: Configuring the jslint Plugin in a build script and calling it from the command line

By default, this is enough to scan for all .js files under the directory where the build script is located and create a JSLint text report using the basic settings.

The not-so-simple case

Of course in the real world the defaults aren’t always what we need, so being able to easily configure the Task is essential. Fortunately, Gradle makes extending a custom Plugin to allow for configuration by a simple Closure, so we can exercise the code from Listing 5 in a build script with the Closure definition in Listing 7.
[groovy language=”true”]
jslint {
haltOnFailure = false
excludes = ‘**/metadata/’
options = ‘rhino’
formatterType = ‘html’
}
[/groovy]
Listing 7: Departing from the default jslint Task configuration

Extending Ant Task capabilities

The Ant Task as is can produce either a plain text document or an xml report, but transforming the results into a more consumable html format is easy to do using an Ant xslt Task. Having Gradle wrap the Task definition allows for simply adding a new formatter type to the configuration and abstracting away the details from the end user. A copy of an xsl file available online is easy to incorporate with the plugin and can be used to transform the xml output into a nicely formatted web page. Being able to program around Ant Tasks like this is a great way to enhance their value in your build. An example of simple output from the test cases included in the Plugin is shown in Figure 1.
[singlepic id=76]
Figure 1: Example html formatted output from jslint

Testing using ProjectBuilder

In order to facilitate testing custom Tasks and Plugins, the Gradle framework provides the ProjectBuilder implementation to handle most of the heavy lifting. This gives you a mocked out instance of a Gradle Project that builds into a temporary directory; very handy for testing how Tasks behave under real working conditions. Having tools like this available directly from the framework removes a lot of potential barriers that might otherwise discourage testing of custom components. The source code that accompanies this article uses the ProjectBuilder to achieve 100% code coverage of the project and is available on github at https://github.com/kellyrob99/gradle-jslint-plugin if you’d like to look closer for some ideas on how to test your own Gradle Plugins. An already built version of the jar is also available if you’d like to try without having to build it yourself: https://github.com/kellyrob99/gradle-jslint-plugin/blob/master/releases/gradle-jslint-plugin-0.1-SNAPSHOT.jar.

How could we improve this Plugin?

This implementation represents the ‘brute-force’ method of wrapping an Ant Task, and there are several ways to enhance its function, if we wanted to spend some additional time and effort on the Plugin. It would actually be far more flexible if we extended the Gradle DefaultTask to provide the actual functionality; this would allow for the possibility of executing the Task separately against different sets of JavaScript in the same project with different configurations of JSLint. In the case of an application with both client and server-side JavaScript, for instance, you might want to apply different rules. In that event you’d probably also want to have the capability to aggregate multiple result sets, which would be a relatively easy feature to add.
Having a separate Task implementation defined would also make it easier to clearly define the inputs and outputs of the process using one of the @Input or @Output Gradle annotations, allowing for incremental builds including JSLint execution. The full set of annotations available from the org.gradle.api.tasks package allow for combining File and/or simple property types to make your Tasks smarter regarding whether or not running again would produce a different result than the last execution.
This article was created using the recently released 0.9 version of Gradle and version 1.4.4 of jslint4java.

Learn more

If you’d like to find out some background or more about Gradle and how to create your own custom Plugins and Tasks, you can find some good information on these sites:

27 Mar, 2011

Hooking into the Jenkins(Hudson) API

Posted by: TheKaptain In: Development

Which one – Hudson or Jenkins?

Both. I started working on this little project a couple of months back using Hudson v1.395 and returned to it after the great divide happened. I took it as an opportunity to see whether there would be any significant problems should I choose to move permanently to Jenkins in the future. There were a couple of hiccups- most notably that the new CLI jar didn’t work right out of the box- but overall v1.401 of Jenkins worked as expected after the switch. The good news is the old version of the CLI jar still works, so this example is actually using a mix of code to get things done. Anyway, the software is great and there’s more than enough credit to go around.

The API

Jenkins/Hudson has a handy remote API packed with information about your builds and supports a rich set of functionality to control them, and the server in general, remotely. It is possible to trigger builds, copy jobs, stop the server and even install plugins remotely. You have your choice of XML, JSON or Python when interacting with the APIs of the server. And, as the build in documentation says, you can find the functionality you need on a relative path from the build server url at:

“/…/api/ where ‘…’ portion is the object for which you’d like to access”.

This will show a brief documentation page if you navigate to it in a browser, and will return a result if you add the desired format as the last part of the path. For instance, to load information about the computer running a locally hosted Jenkins server, a get request on this url would return the result in JSON format: http://localhost:8080/computer/api/json.

[plain language=”true”]
{
"busyExecutors": 0,
"displayName": "nodes",
"computer": [
{
"idle": true,
"executors": [
{
},
{
}
],
"actions": [

],
"temporarilyOffline": false,
"loadStatistics": {
},
"displayName": "master",
"oneOffExecutors": [

],
"manualLaunchAllowed": true,
"offline": false,
"launchSupported": true,
"icon": "computer.png",
"monitorData": {
"hudson.node_monitors.ResponseTimeMonitor": {
"average": 111
},
"hudson.node_monitors.ClockMonitor": {
"diff": 0
},
"hudson.node_monitors.TemporarySpaceMonitor": {
"size": 58392846336
},
"hudson.node_monitors.SwapSpaceMonitor": null,
"hudson.node_monitors.DiskSpaceMonitor": {
"size": 58392846336
},
"hudson.node_monitors.ArchitectureMonitor": "Mac OS X (x86_64)"
},
"offlineCause": null,
"numExecutors": 2,
"jnlpAgent": false
}
],
"totalExecutors": 2
}
[/plain]

Here’s the same tree rendered using GraphViz.

[singlepic id=74 w=700 h=500 mode=watermark]

This functionality extends out in a tree from the root of the server, and you can gate how much of the tree you load from any particular branch by supplying a ‘depth’ parameter on your urls. Be careful how high you specify this variable. Testing with a load depth of four against a populous, long-running build server (dozens of builds with thousands of job executions) managed to regularly timeout for me. To give you an idea, here’s a very rough visualization of the domain at depth three from the root of the api.

[singlepic id=68 w=700 h=500 mode=watermark]

Getting data out of the server is very simple, but the ability to remotely trigger activity on the server is more interesting. In order to trigger a build of a job named ‘test’, a POST on http://localhost:8080/job/test/build does the job. Using the available facilities, it’s pretty easy to do things like:

  • load a job’s configuration file, modify it and create a new job by POSTing the new config.xml file
  • move a job from one build machine to another
  • build up an overview of scheduled builds

The CLI Jar

There’s another way to remotely drive build servers in the CLI jar distributed along with the server. This jar provides simple facilities for executing certain commands remotely on the build server. Of note, this enables installing plugins remotely and executing a remote Groovy shell. I incorporated this functionality with a very thin wrapper around the main class exposed by the CLI jar as shown in the next code sample.

[groovy language=”true”]
/**
* Drive the CLI with multiple arguments to execute.
* Optionally accepts streams for input, output and err, all of which
* are set by default to System unless otherwise specified.
* @param rootUrl
* @param args
* @param input
* @param output
* @param err
* @return
*/
def runCliCommand(String rootUrl, List<String> args, InputStream input = System.in,
OutputStream output = System.out, OutputStream err = System.err)
{
def CLI cli = new CLI(rootUrl.toURI().toURL())
cli.execute(args, input, output, err)
cli.close()
}
[/groovy]

And here’s a simple test showing how you can execute a Groovy script to load information about jobs, similar to what you can do from the built-in Groovy script console on the server, which can be found for a locally installed deployment at http://localhost:8080/script.
[groovy language=”true”]
def "should be able to query hudson object through a groovy script"()
{
final ByteArrayOutputStream output = new ByteArrayOutputStream()
when:
api.runCliCommand(rootUrl, [‘groovysh’, ‘for(item in hudson.model.Hudson.instance.items) { println("job $item.name")}’],
System.in, output, System.err)

then:
println output.toString()
output.toString().split(‘\n’)[0].startsWith(‘job’)
}
[/groovy]

Here are some links to articles about the CLI, if you want to learn more :

HTTPBuilder

HTTPBuilder is my tool of choice when programming against an HTTP API nowadays. The usage is very straightforward and I was able to get away with only two methods to support reaching the entire API: one for GET and one for POST. Here’s the GET method, sufficient for executing the request, parsing the JSON response, and complete with (albeit naive) error handling.
[groovy language=”true”]
/**
* Load info from a particular rootUrl+path, optionally specifying a ‘depth’ query
* parameter(default depth = 0)
*
* @param rootUrl the base url to access
* @param path the api path to append to the rootUrl
* @param depth the depth query parameter to send to the api, defaults to 0
* @return parsed json(as a map) or xml(as GPathResult)
*/
def get(String rootUrl, String path, int depth = 0)
{
def status
HTTPBuilder http = new HTTPBuilder(rootUrl)
http.handler.failure = { resp ->
println "Unexpected failure on $rootUrl$path: ${resp.statusLine} ${resp.status}"
status = resp.status
}

def info
http.get(path: path, query: [depth: depth]) { resp, json ->
info = json
status = resp.status
}
info ?: status
}
[/groovy]

Calling this to fetch data is a one liner, as the only real difference is the ‘path’ variable used when calling the API.
[groovy language=”true”]
private final GetRequestSupport requestSupport = new GetRequestSupport()

/**
* Display the job api for a particular Hudson job.
* @param rootUrl the url for a particular build
* @return job info in json format
*/
def inspectJob(String rootUrl, int depth = 0)
{
requestSupport.get(rootUrl, API_JSON, depth)
}
[/groovy]

Technically, there’s nothing here that limits this to JSON only. One of the great things about HTTPBuilder is that it will happily just try to do the right thing with the response. If the data returned is in JSON format, as these examples are, it gets parsed into a JSONObject. If on the other hand, the data is XML, it gets parsed into a Groovy GPathResult. Both of these are very easily navigable, although the syntax for navigating their object graphs is different.

What can you do with it?

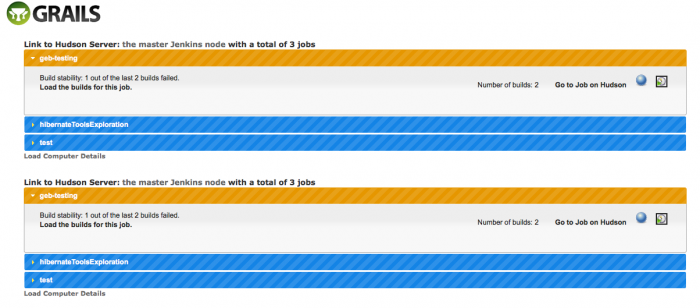
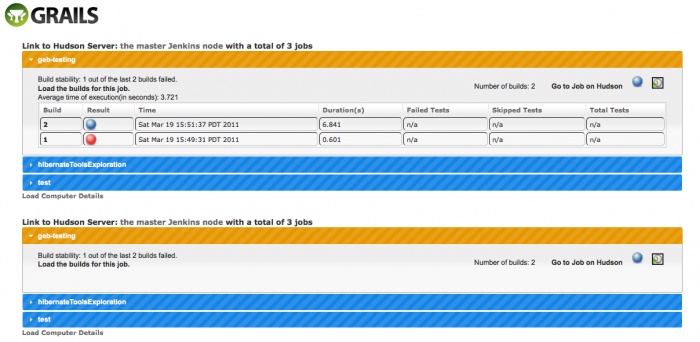
My primary motivation for exploring the API of Hudson/Jenkins was to see how I could make managing multiple servers easier. At present I work daily with four build servers and another handful of slave machines, and support a variety of different version branches. This includes a mix of unit and functional test suites, as well as a continuous deployment job that regularly pushes changes to test machines matching our supported platform matrix, so unfortunately things are not quite as simple as copying a single job when branching. Creating the build infrastructure for new feature branches in an automatic, or at least semi-automatic, fashion is attractive indeed, especially since plans are in the works to expand build automation. For a recent 555 day project, I utilized the API layer to build a Grails app functioning as both a cross-server build radiator and a central facility for server management. This proof of concept is capable of connecting to multiple build servers and visualizing job data as well as specific system configuration, triggering builds, and direct linking to each of the connected servers to allow for drilling down further. Here’s a couple of mock-ups that pretty much show the picture.
[singlepic id=71 w=700 h=500 mode=watermark]
[singlepic id=73 w=700 h=500 mode=watermark]

Just a pretty cool app for installing Jenkins

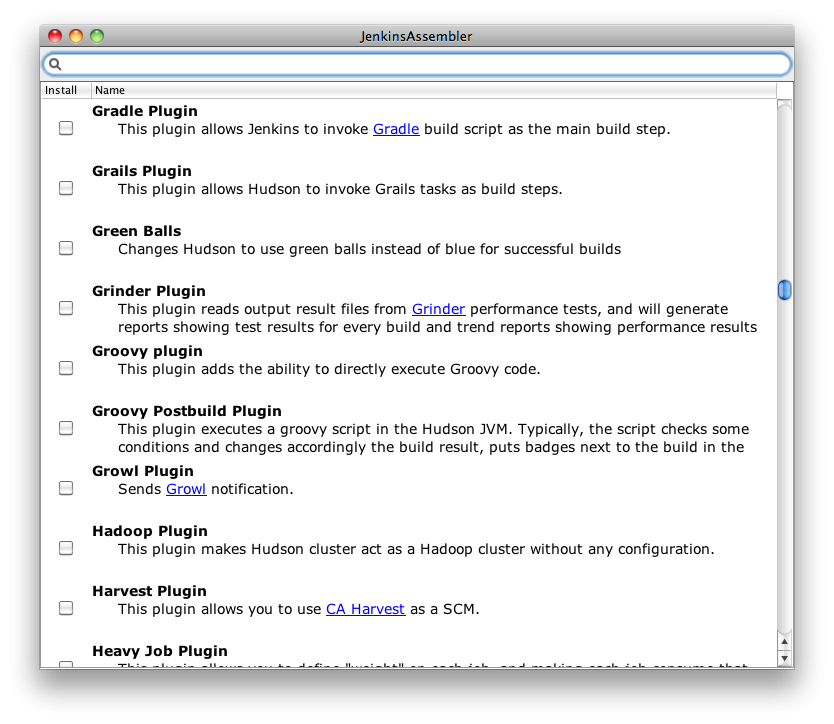
This is only very indirectly related, but I came across this very nice and simple Griffon app, called the Jenkins-Assembler which simplifies preparing your build server. It presents you with a list of plugins, letting you pick and choose, and then downloads and composes them into a single deployable war.
[singlepic id=75]

Enough talking – where’s the code???

Source code related to this article is available on github. The tests are more of an exploration of the live API than an actual test of the code in this project. They run against a local server launched using the Gradle Jetty plugin. Finally, here’s some pretty pictures for you.

[nggallery id=13]

13 Nov, 2010

Why do I Like Gradle?

Posted by: TheKaptain In: Development

Gradle, if you don’t already know it, is rapidly gaining traction as a strong leader in the next generation of build systems. It builds heavily upon excellent aspects of the Maven and Ant frameworks, yet is pitched as not suffering from the same “Frameworkitis“. And I’ve gotta say – the results are pretty spectacular. Among the major selling features, at least as I see it, are:

  • Groovy syntax and a very terse and descriptive dsl that makes build scripts easily comprehensible
  • flexibility of layout, configuration, organizing build logic – pretty much everything
  • incremental builds, based on an easily implementable pattern
  • convention over configuration paradigm, thank you very much Maven
  • clear separation of build configuration from execution
  • extensibility at every level

The most basic Java build

[groovy language=”true”]
apply plugin: ‘java’
[/groovy]
That’s it. One line of Groovy in a file called ‘build.gradle’ and you can build a Java project with a Maven-standardized project layout.

├── build.gradle
└── src
    ├── main
    │   ├── java
    │   └── resources
    └── test
        ├── java
        └── resources

Included with the Java plugin are tasks to compile, package, test and javadoc your code. You also get configuration objects to describe the artifacts that your build depends on and those that it produces. Of course, with this most basic setup these configurations don’t yet have anything in them, but in a complex build they’re very handy for isolating the responsibilities of each task. Because you can both configure the existing configurations and add custom ones yourself, it’s very easy to accommodate a project that follows a different structure, whether that is just differently named source directories or multiple directories that need specific processing. This is VERY handy for legacy builds.

Incremental builds

Gradle provides a very easy way to create tasks that are able to execute only if their declared input and/or output artifacts have changed. This makes it trivial to incorporate your custom build behaviour into an incremental build. As an example I’d like to expand upon something I read by Etienne Studer in this month’s JAXmag. It’s a great example of developing an incremental task. First here’s the task implementation almost verbatim from the article. I’ve updated it slightly to make the output more readable using FileUtils, and you can examine the file it spits out from the build/reports/size directory that will be automatically created when it executes.
[groovy language=”true”]
class Size extends DefaultTask
{
@InputFiles FileTree inputDir
@OutputFile File outputFile

@TaskAction
void generate()
{
def totalSize = inputDir.files.inject(0) { def size, File file -> size + file.size()
}
outputFile.text = FileUtils.byteCountToDisplaySize(totalSize)
}
}
[/groovy]
If you simply include this class definition in a build file, it will be automatically compiled and available for use elsewhere in the script. It could just as easily be defined in a separate file(local or remote), in a jar on the classpath or in the buildSrc directory of your Gradle project. This flexibility enables developing and evolving tasks in a very agile fashion, encouraging you to publish the results for reuse instead of re-implementing the logic in other projects.
In order to execute this task as part of a build, we first need to configure it. In this case, I’m configuring it to work on all declared configurations and all source, both code and associated resources. In order to do so, I’m using a couple of Gradle internal classes, FileTree and SourceSet, which actually sound pretty self-explanatory to me. The key part is the assignment of the ‘inputDir’ and ‘outputFile’ properties on the task.
[groovy language=”true”]
task size(type:Size){
def filetree = sourceSets.inject(new UnionFileTree()) { FileTree total, SourceSet sourceSet ->
total += sourceSet.allSource
total
}
inputDir = filetree
outputFile = file("$reportsDir/size/size.txt")
}
[/groovy]
Just to prove that it’s working incrementally, here’s the output from successive invocations. Note that ‘UP-TO-DATE’ in the output that indicates the task was skipped the second time around, because none of the inputs changed and the output file hasn’t been deleted.
[groovy language=”true”]
gradle-intro$ gradle size
:size

BUILD SUCCESSFUL

Total time: 2.963 secs

gradle-intro$ gradle size
:size UP-TO-DATE

BUILD SUCCESSFUL

Total time: 2.912 secs
[/groovy]
This task does actually have a concrete dependency on the Java plugin, since without that convention applied neither the ‘sourceSets’ or ‘reportsDir’ objects would be present. Here’s the complete version of the build file that’s been built so far, 28 lines including imports and spacing.
[groovy language=”true”]
import org.apache.commons.io.FileUtils
import org.gradle.api.internal.file.UnionFileTree
import org.gradle.api.tasks.SourceSet

apply plugin: ‘java’

task size(type:Size){
def filetree = sourceSets.inject(new UnionFileTree()) { FileTree total, SourceSet sourceSet ->
total += sourceSet.allSource
total
}
inputDir = filetree
outputFile = file("$reportsDir/size/size.txt")
}

class Size extends DefaultTask
{
@InputFiles FileTree inputDir
@OutputFile File outputFile

@TaskAction
void generate()
{
def totalSize = inputDir.files.inject(0) { def size, File file -> size + file.size()
}
outputFile.text = FileUtils.byteCountToDisplaySize(totalSize)
}
}
[/groovy]

Sharing your new Task

The simplest way to share build logic is to ‘apply’ it. This simple shorthand covers everything from plugins to local files to remotely hosted resources. Here’s how easy it is to incorporate this particular task implementation and configuration into a build using a relative file path.
[groovy language=”true”]
apply from : ‘../gradle-intro/build.gradle’
[/groovy]

And because only a simple http connection is required to share it to a broader base, here’s how you can reference a copy on this site. Sorry about the .txt extension, but I didn’t feel like editing php to allow a new filetype today 🙂

[groovy language=”language=:”]
apply from : ‘http://www.kellyrob99.com/blog/wp-content/uploads/downloads/2010/11/gradleSizeTask.txt’
[/groovy]

Some other reading

If you’re still not sold on Gradle, here’s some articles I’ve seen recently that at the very least will give you a better perspective.
Hibernate – Gradle why?
Maven VS Gradle VS Ant
Maven to Gradle: Part 1, Part 2, Part 3
A comparison of build script length
Ant/Gradle/Maven comparison
DZone article
OpenMRS Mailing list on Maven VS Gradle

26 Sep, 2010

Groovy inspect()/Eval for Externalizing Data

Posted by: TheKaptain In: Development

One of the things I love about Groovy is how easy it makes reading and writing text files. I’ve written Groovy scripts for everything from parsing log files for extracting timing information to finding (and replacing with selectors) in-line css blocks. Often there’s a piece of information extracted from a file that I want to keep for further examination, or just for future reference. The Groovy inspect() method provides a nice easy way to take simple results that are stored in variables and write them to a file. Then the Groovy Eval class provides convenience methods to parse that information back from the file in a single line. Here’s examples of test code that creates Lists and Maps, writes them out to a file and then asserts that evaluating the stored Groovy code results in the same data structures.

[groovy language=”true”]
private static final Closure RANDOM_STRING = RandomStringUtils.&randomAlphanumeric
private static final String TMP_DIR = System.getProperty(‘java.io.tmpdir’)

@Test
public void testSerializeListToFile()
{
List<String> accumulator = []
100.times { int i ->
accumulator << RANDOM_STRING(i + 1)
}
File file = new File("$TMP_DIR/inspectListTest.groovy")
file.deleteOnExit()
file << accumulator.inspect()
assertThat(accumulator, equalTo(Eval.me(file.text)))
}

@Test
public void testSerializeMapToFile()
{
Map<String, String> accumulator = [:]
100.times { int i ->
accumulator[RANDOM_STRING(i + 1)] = RANDOM_STRING(i + 1)
}
File file = new File("$TMP_DIR/inspectMapTest.groovy")
file.deleteOnExit()
file << accumulator.inspect()
assertThat(accumulator, equalTo(Eval.me(file.text)))
}
[/groovy]

Two little tidbits of goodness embedded in this example are the ability to capture a method as a closure, in this case RandomStringUtils.randomAlphanumeric(), and the File.deleteOnExit() method – which is only cool because I never noticed it in the API before and it turns out to be a great way to clean up after tests.
🙂

A particular usage of this technique I’ve been using lately has been sparked by a shift of tools at work. I’ve worked with the Atlassian stack of web applications for years now, and have always enjoyed the rich feedback Bamboo gives for build history. But now I’m using Hudson as the primary continuous integration tool and one of the things I’ve been sorely missing is the ‘Top 10 Longest Running Tests’. If you’re not familiar with this view in Bamboo, stroll on over to the Groovy build results page and click on the tab.
One of my present priorities at work is to speed up build times and rooting out slow or inefficient tests is one way to do this. It’s possible to elicit this information from JUnit test reports using xsl(see this link for an example) but I came up with a nice way to incorporate similar functionality into a Gradle build. Following the Gradle project-report conventions, this task simply uses the inspect() method to write out a results file in the ‘reportsDir’. I’ve captured this output(manually) over time to track the progress of speeding up test times, and the format makes it easy to read back in results and do deeper analysis and aggregation – such as the creation of csv reports and simple graphs for instance.

[groovy language=”true”]
tolerance = 2.0
task findLongRunningTests << {
description= "find all tests that take over $tolerance seconds to run"
String testDir = "${project.reportsDir}/tests".toString()
file(testDir).mkdirs()
File file = file("$testDir/longRunningTests.txt")
file.createNewFile()
BufferedWriter writer = file.newWriter()
writer << parseTestResults(‘**/TESTS-TestSuites.xml’, tolerance)
writer.close()
}

/**
* Read in xml files in the junit format and extract test names and times
* @includePattern ant pattern describing junit xml reports to inspect, recursively gathered from the rootDir
* @tolerance the number of seconds over which tests should be included in the report
*/
private String parseTestResults(includePattern, float tolerance)
{
def resultMap = [:]
fileTree(dir: rootDir, include: includePattern).files.each {
def testResult = new XmlSlurper().parse(it)
testResult.depthFirst().findAll {it.name() == ‘testcase’}.each { testcase ->
def key = [testcase.@classname.text(), testcase.@name.text()].join(‘:’)
def value = testcase.@time.text() as float
resultMap[(key)] = value
}
}
return resultMap.findAll {it.value > tolerance}.sort {-it.value}.inspect()
}
[/groovy]

Note that this works recursively from the ‘rootDir’ of a Project, so it is effective for multi-project Gradle builds. Source code for this simple example is available on github if you want to check it out yourself.

Here’s a sample result drawn from examining some test output in the Gradle build itself. Only one of the tests executed in WrapperTest takes more than 2 seconds to execute.
[groovy language=”true”]
["org.gradle.api.tasks.wrapper.WrapperTest:testWrapper":2.37]
[/groovy]