The Kaptain on … stuff

10 Mar, 2013

Groovy and HTTP Servers

Posted by: TheKaptain In: Development

This article originally appeared in the January 2013 issue of GroovyMag.

There’s no denying that the World Wide Web has become absolutely integral for information storage and delivery. There are more than 600 million sites serving up over 80 billion individual pages and many more pages and web services being added every day(http://news.netcraft.com/archives/2012/09/10/september-2012-web-server-survey.html). And behind each site is – you guessed it! – a web server. Nowadays we have a large number of JVM web server alternatives for serving up content, and some serious Groovy and polyglot contenders as well. In this article I’ll detail some of the alternatives with a focus on embeddable options, and describe what Groovy can do to make things easier than traditional Java-only implementation and configuration. We’ll configure some different servers to host a single service that reverses a query parameter and returns the result. All of these solutions can be embedded in a Groovy program and require little or no external configuration.
Note: Some of the solutions described are appropriate for a production environment while others are more suitable for smaller tasks like serving documents exclusively for an internal network or providing simple testing environments.

The test project

In order to provide an environment for standing up multiple web servers and demonstrating various HTTP requests, we’ll be using a Gradle build and some simple Spock tests. The full source code is available at https://github.com/kellyrob99/groovy-http and I hope you’ll clone a copy to take a closer look. This is the same project previously used(GroovyMag December 2012) to detail Groovy for working with http clients but expanded to look at the server-side capabilities as well. It includes the Gradle wrapper, so you should be able to check it out and run all tests with a simple invocation of ./gradlew build.

Java 1.6 HttpServer

The simplest alternative to serve up content with no external library dependencies in Java is the HttpServer included starting in Java 1.6. Standing up a server is extremely simple, requiring no external configuration – or much of anything else really. You simply create the server, declare some contexts(which match to paths) and assign a handler for each context. The entire code in Groovy for configuring the server to host our ‘reverse’ service is shown in Listing 1.

[sourcecode language=”groovy”]
//configuring a Java 6 HttpServer
InetSocketAddress addr = new InetSocketAddress(HTTP_SERVER_PORT)
httpServer = com.sun.net.httpserver.HttpServer.create(addr, 0)
httpServer.with {
createContext(‘/’, new ReverseHandler())
createContext(‘/groovy/’, new GroovyReverseHandler())
setExecutor(Executors.newCachedThreadPool())
start()
}
[/sourcecode]
Listing 1: Configuring an HttpServer in Groovy

So we’re binding to a port for incoming requests, assigning a handler for all requests on the root context path, configuring the server with a thread pool and starting it up. The only part we have to supply are the handlers, of which a Java version implementing HttpHandler is shown in Listing 2. All it does is return the single expected ‘string’ parameter in reverse. It also performs some simple error handling in case the parameter is missing and returns an HTTP 400 Bad request code in this case.

[sourcecode language=”java”]
class ReverseHandler implements HttpHandler {
@Override
public void handle(HttpExchange httpExchange) throws IOException
{
String requestMethod = httpExchange.getRequestMethod();
if (requestMethod.equalsIgnoreCase("GET")) {
Headers responseHeaders = httpExchange.getResponseHeaders();
responseHeaders.set("Content-Type", "text/plain");
OutputStream responseBody = httpExchange.getResponseBody();

final String query = httpExchange.getRequestURI().getRawQuery();
if (query == null || !query.contains("string")) {
httpExchange.sendResponseHeaders(400, 0);
return;
}

final String[] param = query.split("=");
assert param.length == 2 && param[0].equals("string");

httpExchange.sendResponseHeaders(200, 0);
responseBody.write(new StringBuffer(param[1]).reverse().toString().getBytes());
responseBody.close();
}
}
}

[/sourcecode]
Listing 2: Simple handler for HttpServer requests

We can make this somewhat less verbose by coding the handler in Groovy(see the GroovyReverseHandler in the source code), but the very low level API makes the difference in this example pretty small. More importantly, since we can code both the HttpHandler implementation and the server code into a single Groovy script, we can launch a simple web server from the command line with ease, i.e. groovy server.groovy
You’re not going to want to use this for hosting an entire web site, but it is perfectly usable for serving up small amounts of content, providing simple services or perhaps mocking up services for testing a client implementation.

Embedded Jetty

This is a complete solution for including all of the power of Jetty within your application. Since Jetty is a Servlet container, we can immediately make use of the GroovyServlet available in the standard Groovy distribution and serve up Groovlets that can be created and modified dynamically at runtime. First, let’s configure a Jetty 8 server and context to serve files using the GroovyServlet, as shown in Listing 3.

[sourcecode language=”groovy”]
//configuring Jetty 8 with GroovyServlet support
ServletContextHandler context = new ServletContextHandler(ServletContextHandler.NO_SESSIONS)
context.with {
contextPath = ‘/’
resourceBase = ‘src/main/webapp’
addServlet(GroovyServlet, ‘*.groovy’)
}
jettyServer = new Server(JETTY_SERVER_PORT)
jettyServer.with {
setHandler(context)
start()
}
[/sourcecode]
Listing 3: Configuring Jetty 8 with GroovyServlet

This will serve up any files under the directory src/main/webapp with the suffix .groovy. These files are compiled on the fly and the GroovyServlet detects if the files are modified so that it can recompile them as necessary. For the purpose of our simple ‘reverse’ service, the code in Listing 4 shows a Groovlet implementation. Because within the Groovlet our output is wired into the Servlet output stream, a simple println is sufficient for writing back a limited response. It’s simple things like this that make you almost forget that you’re coding a Servlet as so much of the normal boilerplate involved in coding one isn’t required.

[sourcecode language=”groovy”]
import javax.servlet.http.HttpServletResponse

final string = request.parameterMap.string
if (!string || string.size() != 1){
response.setStatus(HttpServletResponse.SC_BAD_REQUEST)
return
}
print URLDecoder.decode(string[0], ‘UTF-8’).reverse()
[/sourcecode]
Listing 4: Groovlet which returns the passed in parameter in reverse

Notice that in this case the passed in parameters are unmarshalled for us and available in the request.parameterMap variable. And I hope that you agree this implementation is significantly less verbose and easier to understand that the HttpHandler we defined earlier to do the same thing in Java.
Perhaps more importantly, this entire web server can be defined and executed as a Groovy script with the help of a single @Grab annotation. The full script is shown in Listing 5.

[sourcecode language=”groovy”]
@Grab(‘org.eclipse.jetty.aggregate:jetty-all-server:8.1.0.v20120127’)
import org.eclipse.jetty.servlet.ServletContextHandler
import groovy.servlet.GroovyServlet
import org.eclipse.jetty.server.Server

int JETTY_SERVER_PORT = 8094
ServletContextHandler context = new ServletContextHandler(ServletContextHandler.NO_SESSIONS)
context.with {
contextPath = ‘/’
resourceBase = ‘src/main/webapp’
addServlet(GroovyServlet, ‘*.groovy’)
}
jettyServer = new Server(JETTY_SERVER_PORT)
jettyServer.with {
setHandler(context)
start()
}
[/sourcecode]
Listing 5: Groovy script which launches a Jetty web server in under 20 lines

Jetty is a very versatile server platform and Groovy makes it extremely easy to stand up and work with. The full scope of capabilities is definitely beyond the scope of this article, but if you can do it with Jetty in a plain Java environment, you can do it in Groovy as well – just with less typing 🙂

And with just-Java you would definitely need to configure some extra pieces in order to get going, whereas Groovy can do it using nothing more than the default tools that come along with the distribution(and an internet connection, of course). If you are in need of a lightweight web server for pretty much any purpose this would be my first suggestion. Oh, and unlike deploying Jetty in a stand-alone fashion, there’s no XML configuration required – always a bonus in my books.

Restlet and Groovy-Restlet

Restlet is a platform specifically designed to help build RESTful applications quickly and reliably. I’m not personally very familiar with it, but having developed and worked with many different REST APIs I definitely appreciate the idea of a framework designed specifically for the use case. Java classes in the Restlet API are mapped directly to the REST concepts, making it very easy to implement the required services while abstracting away any specific protocol being used to communicate between resources. The Groovy-Restlet project adds a DSL built extending Groovy’s FactoryBuilderSupport class to the equation. In the simplest case, we create a GroovyRestlet object and configure our Restlet system using an external Groovy file expressing the DSL. Listing 6 shows the code used to bootstrap the Restlet application. Notice how we’re passing in a variable for the port to be used during the script evaluation.

[sourcecode language=”groovy”]
//configuring a Restlet Server and Client using an external dsl file
GroovyRestlet gr = new GroovyRestlet()
gr.builder.setVariable(‘port’, RESTLET_SERVER_PORT)
(restletClient, restletServer) = gr.build(new File(‘src/test/resources/restlet/reverseRestlet.groovy’).toURI()) as List
[/sourcecode]
Listing 6: Initializing a Restlet application in Groovy

Here we’re using the Groovy multiple assignment feature so that we can return handles to both the org.restlet.Server and org.restlet.Client objects created in the script. The DSL script shown in Listing 7 shows how these objects are initialized. This is our ‘reverse’ service implemented taking advantage of some of the niceties of Restlet, including easy parameter parsing using the Form abstraction, easy HTTP status handling and the ability to immediately create a matching Client for a Server.

[sourcecode language=”groovy”]
import org.restlet.data.*

def myPort = builder.getVariable(‘port’)
def server = builder.server(protocol: protocol.HTTP, port: myPort) {
restlet(handle: {Request req, Response resp ->
Form form = req.resourceRef.queryAsForm
if (form.isEmpty() || !form[0].name == ‘string’) {
resp.setStatus(Status.CLIENT_ERROR_BAD_REQUEST, "Missing ‘string’ param")
}
else {
resp.setEntity(form[0].value.reverse(), mediaType.TEXT_PLAIN)
}
})
}
server.start();

def client = builder.client(protocol: protocol.HTTP)

[client, server] //return a list so we can work with the client and eventually stop the server
[/sourcecode]
Listing 7: Groovy-Restlet configuration DSL

We can test the Client behaviour for correct execution and for error conditions using Spock, as shown in Listings 8 and 9 respectively.

[sourcecode language=”groovy”]
def "restlet reverse test"() {
when: ‘We use the Restlet Client to execute a GET request against the Restlet Server’
String response = restletClient.get("http://localhost:$RESTLET_SERVER_PORT/?string=$TEST_STRING").entity.text

then: ‘We get the same text back in reverse’
TEST_STRING.reverse() == response
}
[/sourcecode]
Listing 8: Executing a GET request with the Restlet Client

Restlet also exposes some handy methods for inspecting error status and messaging in Listing 9.

[sourcecode language=”groovy”]
def "restlet failure with client error"() {
when: ‘We forget to include the required parameter to Restlet’
org.restlet.data.Response response = restletClient.get("http://localhost:$RESTLET_SERVER_PORT")

then: ‘An exception is thrown and we get an HTTP 400 response indicated as a client error’
response.status.isClientError()
!response.status.isServerError()
response.status.code == 400
response.status.description == MISSING_STRING_PARAM
null == response.entity.text
}
[/sourcecode]
Listing 9: Executing a failing GET request with the Restlet Client

The Groovy-Restlet DSL makes it fairly easy to configure a Restlet application but I wouldn’t necessarily suggest it for “real world” use. For one thing, it only works with an older version of Restlet, and for another it does not appear to be actively maintained. There’s a sparsity of documentation available but that’s not really a problem if you’re willing to check out and read the very small implementation and available examples. It would be nice to see this project updated to utilize the latest Restlet version, in which case it would be a lot more attractive to keep up with. That said, you can still deploy a complete web server using this all of this technology in a single Groovy script.

Embedded vert.x

The vert.x project(http://vertx.io/) describes itself as:

“Vert.x is the framework for the next generation of asynchronous, effortlessly scalable, concurrent applications.
Vert.x is an event driven application framework that runs on the JVM – a run-time with real concurrency and unrivaled performance. Vert.x then exposes the API in Ruby, Java, Groovy, JavaScript and Python. So you choose what language you want to use. Scala and Clojure support is on the roadmap too.”

Essentially vert.x provides a Reactor pattern based server platform that supports polyglot programming at its lowest level. It has also been touted as a JVM polyglot alternative to Node.js. You can install vert.x locally and then use its command line program vertx to load specifications from files written in Groovy, JavaScript, Ruby and other languages. Or you can embed the library in the JVM program of choice and configure it directly in code. For Groovy at least, the syntax is almost identical and looks like that shown in Listing 10 for configuring a org.vertx.groovy.core.http.HttpServer object.

[sourcecode language=”groovy”]
Vertx vertx = Vertx.newVertx()
final org.vertx.groovy.core.http.HttpServer server = vertx.createHttpServer()
server.requestHandler { HttpClientRequest req ->
if (req.params[‘string’] == null) {
req.response.with {
statusCode = 400
statusMessage = MISSING_STRING_PARAM
end()
}
}
else {
req.response.end(req.params[‘string’].reverse())
}

}.listen(VERTX_PORT, ‘localhost’)
[/sourcecode]
Listing 10: Configuring a vert.x HttpServer in Groovy

Vert.x will automatically unmarshall parameters into a Map for us, and the HttpClientRequest class used in the handler provides access to a variety of convenience method for interacting with both the request and response objects.
Creating a org.vertx.groovy.core.http.HttpClient object is even easier and demonstrated in Listing 11.

[sourcecode language=”groovy”]
def client = vertx.createHttpClient(port: VERTX_PORT, host: ‘localhost’)
[/sourcecode]
Listing 11: One liner to create a vert.x HttpClient in Groovy

Interacting with this client is very easy and again provides convenience methods for dealing with the response, including buffering the returned data. It should be noted that in this particular example we’re negating that last benefit by calling toString() on the returned buffer for convenience. Assertions are embedded in the code in Listing 12 as I’m pulling it directly from a Spock test exercising the vert.x client.

[sourcecode language=”groovy”]
client.getNow("/") { resp ->
400 == resp.statusCode
MISSING_STRING_PARAM == resp.statusMessage
}

client.getNow("/?string=$TEST_STRING") { resp ->
200 == resp.statusCode
resp.dataHandler { buffer ->
TEST_STRING.reverse() == buffer.toString()
}
}
[/sourcecode]
Listing 12: Exercising GET requests for passing and failing conditions using a vert.x Client in a Spock test

This is pretty much the simplest possible example, and really doesn’t do a good job of showing off the features of vert.x. The platform boasts a public repository for sharing and accessing modules, a built in event bus for communicating internally and externally and a concurrency model that allows you to forget about synchronizing code and concentrate on business logic – among other things. Asynchronous servers like this and node.js are almost certainly going to continue playing a bigger part on the internet with the enormous increase in web service usage. They provide some answers to classic scaling problems, and are a very natural fit with newer technology requirements like WebSockets.

Note that since vert.x depends on the asynchronous NIO features in Java 7, it will only work with Java versions higher than 1.7

Other alternatives

This is hardly an exhaustive list of the web server platforms nowadays supporting Groovy and/or polyglot capabilities. Some others include:

  • Graffitti is inspired by the Ruby Sinatra server and implemented entirely in Groovy. The project is hosted at https://github.com/webdevwilson/graffiti
  • Ratpack is again a Groovy port of the Sinatra server. The project is hosted at https://github.com/tlberglund/Ratpack
  • The Google App Engine can be used to serve up Servlets/Groovlets and the Gaelyk framework greatly simplifies interacting with the available Google services. Gaelyk is hosted at https://github.com/gaelyk/gaelyk
  • Gretty is a very promising Groovy wrapper around the Java Netty(https://netty.io/) server, providing a DSL for simplified declaration and configuration of Netty components. Unfortunately this project appears largely dormant and does not appear to work with newer versions of Groovy. The code is hosted at https://github.com/groovypp/gretty. Vert.x also employs Netty under the hood to get things done.

As usual, anything you can get done in Java you can also get done in Groovy. We’ve covered a few of the available options for creating and interacting with a variety of open source web servers that run on the JVM. More and more there is support for polyglot programming on the JVM, and hopefully this article has given you some ideas for using Groovy to help you be more productive with web server development. In particular, where a particular platform provides a fluent interface or DSL(like Groovy-Restlet and vert.x do) for configuration the benefits are immediately apparent. For me personally, the main benefits can be summarized as:

  • less code to maintain due to basic Groovy syntactic sugar for common functions and availability of DSLs to create expressive code in a terse fashion
  • removal of the need for XML configuration common in most web server deployment environments
  • ability to encapsulate all functionality into a single script for deployment, depending only on having Groovy available to run the script

Please give some of these ideas a try, and I would love to hear back from you regarding your own experiences using Groovy and HTTP.

Learn more

10 Feb, 2013

Groovy and HTTP

Posted by: TheKaptain In: Development

This article originally appeared in the December 2012 issue of GroovyMag.

Some different ways that Groovy makes interacting with the web easier

One of the major benefits of Groovy is how it simplifies some of the common scenarios we deal with in Java. Complex code with conditionals, error handling and many other concerns can be expressed in a very concise and easily understandable fashion. This article will touch on some convenient Groovy-isms related to interacting with content over HTTP. First we’ll look at some of the syntactic sugar added to the standard Java classes that simplify GET and POST requests, and then we’ll take a look at how the HTTPBuilder module provides a DSL for using the HttpClient library.

The test project

In order to provide an environment for putting up a website and demonstrating various HTTP requests, we’ll be using the Gradle Jetty plugin and some simple Groovlets. The full source code is available at https://github.com/kellyrob99/groovy-http and I hope you’ll clone a copy to take a closer look. The simple index page contains the ‘hello world’ content shown in Listing 1.
[sourcecode language=”xml”]
<!DOCTYPE html>
<html>
<head>
<title>Groovy HTTP</title>
</head>
<body>
<p>hello world</p>
</body>
</html>
[/sourcecode]
Listing 1: Our ‘hello world’ index page used for testing

We’ll start with the simplest available methods for interacting with HTTP using Groovy and no additional library support.

Groovy methods added to String and URL

The DefaultGroovyMethods class provides a couple of very handy methods to enhance the default operation of the String and URL classes. In particular for String we have a new toURL() method and, for URL, the text property. In addition, the URL class is enhanced with convenience methods for working with associated InputStream and OutputStreams.

String.toURL()

This is a small gain as all you’re really doing is avoiding a call to new URL(String spec). The difference in keystrokes isn’t large but, combined with some other MetaClass benefits of Groovy, it can be very helpful for creating fluent and easily understandable code.

URL.text()

This seemingly small addition to the API of the URL class abstracts away a lot of the usual boilerplate involved in streaming content over a URLConnection. Underneath the hood is a very sensible implementation that buffers the underlying connection and automatically handles the closing of all resources for you. For most use cases the default behaviour is likely to be sufficient but, if not, there are overloaded URL.text(String charset) and URL.text(Map parameters, String charset) methods that allow for modification and handle more specifics of the connection configuration.
The one line invocation in Listing 2 demonstrates how to load an html page, returning the raw html as a String.

[sourcecode language=”groovy”]
String html = ‘http://localhost:8081/groovy-http’.toURL().text
[/sourcecode]
Listing 2: One liner to initiate an HTTP GET request for an html page

There’s still a lot that could go wrong using this shorthand syntax for an HTTP request, as several exceptions might be thrown depending on whether or not the url is correctly formatted, or if the content specified doesn’t exist. The Spock test shown in Listing 3 exercises both of these conditions. Note that a 404 response will result in a FileNotFoundException.

[sourcecode language=”groovy”]
@Unroll("The url #url should throw an exception of type #exception")
def "exceptions can be thrown converting a String to URL and accessing the text"() {
when:
String html = url.toURL().text

then:
def e = thrown(exception)

where:
url | exception
‘htp://foo.com’ | MalformedURLException
‘http://google.com/notThere’ | FileNotFoundException
}
[/sourcecode]
Listing 3: Spock test showing some possible failure conditions for our GET request

For comparison let’s take a look at what the same GET request looks like using a URL in Java, shown in Listing 4.

[sourcecode language=”java”]
URL html = new URL(‘http://localhost:8081/groovy-http/index.html’);
URLConnection urlConnection = html.openConnection();
BufferedReader reader = new BufferedReader(
new InputStreamReader(urlConnection.getInputStream()));
StringBuffer response = new StringBuffer();
String inputLine;
while ((inputLine = reader.readLine()) != null)
{
response.append(inputLine)
}
reader.close();
[/sourcecode]
Listing 4: The Java version of reading from a URLConnection (based on the canonical example from Oracle.com)

There’s still no error handling in place in the Java version which is obviously a much more verbose way to load the same data.

POST with URL streams

Similarly to simplifying GET requests, executing a POST using Groovy can take advantage of some of the enhancements to common Java classes. In particular, simplified stream handling allows for tight, correct and expressive coding. Listing 5 shows a Spock test configuring the URLConnection, POSTing some data and reading back the result from the connection.

[sourcecode language=”groovy”]
private static final String POST_RESPONSE = ‘Successfully posted [arg:[foo]] with method POST’

def "POST from a URLConnection"() {
when:
final HttpURLConnection connection = makeURL(‘post.groovy’).toURL().openConnection()
connection.setDoOutput(true)
connection.outputStream.withWriter { Writer writer ->
writer << "arg=foo"
}

String response = connection.inputStream.withReader { Reader reader -> reader.text }

then:
connection.responseCode == HttpServletResponse.SC_OK
response == POST_RESPONSE
}
[/sourcecode]
Listing 5: POST request using Groovy and a URLConnection

Notice that we don’t have to explicitly cast the connection to HttpUrlConnection in order to get the responseCode back, and that we don’t have to explicitly close any of the streams used. Also, we don’t need to create local variables for the Reader/Writer object as we would have to in Java; similarly no calls to ‘new’ are required, as Object creation is all hidden behind the convenience methods. The equivalent Java code requires four calls to new and two to close(), as well as much more involved code for extracting the result. The canonical example of how to do this in Java can be seen on http://docs.oracle.com/javase/tutorial/networking/urls/readingWriting.html

Note that you can also parse response content very easily using the XmlSlurper / XmlParser and JsonSlurper classes included in the standard Groovy distribution.

HttpClient and HTTPBuilder make things even easier

The reality is that in most modern Java applications developers have some nice alternatives to directly working with URL and URLConnection objects for working with HTTP. One of the more popular libraries available is HttpClient and its successor HttpComponents. Wrappers for all of the HTTP verbs are provided which simplifies configuration, execution and consumption of responses. Listing 6 shows a Spock test using HttpClient and mirroring our prior GET examples.

[sourcecode language=”groovy”]
def "HttpClient example in Java"() {
when:
HttpClient httpclient = new DefaultHttpClient();
HttpGet httpget = new HttpGet(makeURL("helloWorld.groovy"));
ResponseHandler<String> responseHandler = new BasicResponseHandler();
String responseBody = httpclient.execute(httpget, responseHandler);

then:
responseBody == HELLO_WORLD_HTML
}
[/sourcecode]
Listing 6: HttpClient GET example

This can be further reduced if there is no need for keeping the intermediate variables around. In fact, we can get it down to the single line shown in Listing 7.

[sourcecode language=”groovy”]
String response = new DefaultHttpClient().execute(new HttpGet(makeURL("helloWorld.groovy")), new BasicResponseHandler())
[/sourcecode]
Listing 7: HttpClient GET one-liner

This is obviously a lot easier on the eyes and very clear in intent. The HttpClient library also has convenience mechanisms for declaring common behaviour across connections, an API for providing custom response parsing implementations and automatic handling for (most of) the underlying resource streams and connections. For those of us using Groovy, there’s a nice wrapper for HttpClient called HTTPBuilder that adds a DSL-style configuration mechanism and some very nice features in terms of error handling and content parsing. Listing 8 shows our standard GET example again, this time working against an object called http assigned from new HTTPBuilder(Object uri). Note that we’re using Groovy’s multiple assignment feature to return and assign multiple values from our Closure.

[sourcecode language=”groovy”]
def "GET with HTTPBuilder"() {
when:
def (html, responseStatus) = http.get(path: ‘helloWorld.groovy’, contentType: TEXT) { resp, reader ->
[reader.text, resp.status]
}

then:
responseStatus == HttpServletResponse.SC_OK
html == HELLO_WORLD_HTML
}
[/sourcecode]
Listing 8: Spock test showing Groovy HTTPBuilder GET support

If you noticed in Listing 8 I explicitly set the request with contentType: TEXT, it’s because HTTPBuilder by default provides automatic response content type detection and parsing. Since I’m requesting an xml document, HTTPBuilder can automatically parse the result with Groovy’s XmlSlurper. HTTPBuilder can also detect that it is an html page and pass the response through NekoHTML first to ensure that you’re working with a well-formed document. Listing 9 shows the slight difference in how we could interact with the parsed response content and the reader in our Closure from Listing 8 is quietly replaced with a GPathResult referring to the parsed content.

[sourcecode language=”groovy”]
def "GET with HTTPBuilder and automatic parsing"() {
when:
def (html, responseStatus) = http.get(path: ‘helloWorld.groovy’) { resp, reader ->
[reader, resp.status]
}

then:
responseStatus == HttpServletResponse.SC_OK
html instanceof GPathResult
html.BODY.P.text() == ‘hello world’
}
[/sourcecode]
Listing 9: automatic detection and parsing of xml

It’s unlikely that you’re going to be parsing a lot of html this way but with the abundance of xml services available nowadays automated parsing can be very helpful. The same applies for JSON and if we give a hint as to the contentType we can get back a parsed JSONObject when interacting with such services as shown in Listing 10.

[sourcecode language=”groovy”]
def "GET with HTTPBuilder and automatic JSON parsing"() {
when:
def (json, responseStatus) = http.get(path: ‘indexJson.groovy’, contentType: JSON) { resp, reader ->
[reader, resp.status]
}

then:
responseStatus == HttpServletResponse.SC_OK
json instanceof JSONObject
json.html.body.p == ‘hello world’
}
[/sourcecode]
Listing 10: automatic parsing of JSON responses

The HTTPBuilder module also has some convenience methods for handling failure conditions. By allowing for specifying both default failure handlers and specific behaviour for individual requests you’ve got lots of options at your disposal. Listing 11 shows how to define a default failure handler that simply traps the response code. Note that the Closure used for hading GET response is never run since in this case the page we’re requesting results in an HTTP 404 Not Found response code.

[sourcecode language=”groovy”]
def "GET with HTTPBuilder and error handling"() {
when:
int responseStatus
http.handler.failure = { resp ->
responseStatus = resp.status
}
http.get(path: ‘notThere.groovy’, contentType: TEXT) { resp, reader ->
throw new IllegalStateException(‘should not be executed’)
}

then:
responseStatus == HttpServletResponse.SC_NOT_FOUND
}
[/sourcecode]
Listing 11: Defining a failure handler with HTTPBuilder

POSTing data with HTTPBuilder is also very straightforward, requiring only an additional body parameter as shown in Listing 12.

[sourcecode language=”groovy”]
def "POST with HTTPBuilder"() {
when:
def (response, responseStatus) = http.post(path: ‘post.groovy’, body: [arg: ‘foo’]) { resp, reader ->
[reader.text(),resp.status]
}

then:
responseStatus == HttpServletResponse.SC_OK
response == POST_RESPONSE
}
[/sourcecode]
Listing 12: POST using HTTPBuilder

HTTPBuilder also provides some more specific abstractions for dealing with certain scenarios. There’s RESTClient for dealing with RESTful webservices in a simplified manner, there’s AsyncHTTPBuilder for asynchronously executing requests and for the Google App Engine, which doesn’t allow socket based connections, there’s the HttpURLClient which wraps HttpUrlConnection usage.

Conclusion

Hopefully this has given you a taste for what Groovy can do to help you with HTTP interactions and gives you some ideas for making your own HTTP client applications a bit Groovier.

More reading

Next month we’ll take a closer look at how Groovy can simplify working with a variety of embedded http server alternatives – see you then!

08 Dec, 2012

Kuler iTerm2 Themes with Groovy Scripting

Posted by: TheKaptain In: Development

Having recently purchased a new MBP laptop, I was going through the usual new computer activities and installing one of my favorite apps, the iTerm2 terminal program. This program really shines for managing multiple terminal windows, and recently they added the ability to easily import and export color themes for sharing. I, of course, got immediately distracted with a shiny new feature and ended up spending an afternoon writing some code to try it out. Along the way I grabbed some color themes from the Adobe Kuler site, built a quick and dirty SwingBuilder script to visualize the themes and wrote a script for emitting Apple plist files suitable for import into iTerm2.

Adobe Kuler

This is a nice resource for finding and building color themes primarily intended for web consumption. Each theme boils down to five colors represented as hexadecimal which can be applied to a layout design in a fairly predictable pattern. In addition to using the website directly, RSS feeds are made available for accessing shared themes. This makes grabbing a handful of themes for experimentation very easy to accomplish with the Groovy XmlSlurper.

Here’s an excerpt of the RSS feed we’re parsing, representing a five color theme named ‘Feeling Etsy’.
[xml]
<item>
<title>Theme Title: Feeling Etsy</title>
<link>http://kuler.adobe.com/index.cfm#themeID/1892986</link>
<guid>http://kuler.adobe.com/index.cfm#themeID/1892986</guid>
<enclosure xmlns="http://www.solitude.dk/syndication/enclosures/">
<title>Feeling Etsy</title>
<link length="1" type="image/png">
<url>http://kuler-api.adobe.com/kuler/themeImages/theme_1892986.png</url>
</link>
</enclosure>
<description>
&lt;img src="http://kuler-api.adobe.com/kuler/themeImages/theme_1892986.png" /&gt;&lt;br /&gt;

Artist: kenzia.studio&lt;br /&gt;
ThemeID: 1892986&lt;br /&gt;
Posted: 05/02/2012&lt;br /&gt;

Tags:
community…., join, lifestyle, share, vintage
&lt;br /&gt;

Hex:
DCEBDD, A0D5D6, 789AA1, 304345, AD9A27</description>


[/xml]

And here’s parsing code that queries for 100 of the ‘top rated’ and 100 of the ‘popular’ themes, serializing them out to a Groovy script file. There’s going to be some overlap in these two sets, so the end result is somewhat less than 200 themes.

[groovy language=”true”]
/**
* Reads RSS feeds from kuler and extracts the hexadecimal representation of each five element theme, writing those
* values to a file.
*/
def feeds = [
new URL("http://kuler-api.adobe.com/feeds/rss/get.cfm?itemsPerPage=100&listType=rating"),
new URL("http://kuler-api.adobe.com/feeds/rss/get.cfm?itemsPerPage=100&listType=popular")
]
def mappedThemes = [:]
def slurp = {rssXML, themes ->
def xml = new XmlSlurper().parseText(rssXML)
xml.channel.item.each { theme ->
println theme.title
def desc = theme.description.toString().split(‘\n’)
def hex = desc[-1]
hex = hex.replaceAll(‘\t’, ”)
hex = hex.replaceAll(‘ ‘, ”)
themes.put(theme.title.toString().replaceAll(‘Theme Title:’, ”).trim().replaceAll(‘ ‘, ‘_’)
.replaceAll(‘\”, ‘_’).toLowerCase(), hex.split(‘,’))
}
}

feeds.each { URL url ->
slurp(url.text, mappedThemes)
}

println mappedThemes.keySet().size()

def themeMapFile = new File("kulerThemeMap-${new Date().format(‘yyMMddHHmmss’)}.groovy")
themeMapFile << "themeMap = ${mappedThemes.inspect()}"
themeMapFile.absolutePath
[/groovy]

The end result is a Groovy script file containing a single Map type variable named ‘themeMap’ in the global scope. This file can be interpreted by a GroovyShell to extract the Map of themes easily – not the best way to serialize the data but I actually wrote this parsing code a couple of years back and just wanted to quickly incorporate it into today’s efforts so I left it as is.

Output in the file is just a Map of the theme name to the five corresponding hexadecimal color codes.
[groovy language=”true”]
themeMap = [‘pie_party__for_all_kulerist!!!’:[‘690011’, ‘BF0426’, ‘CC2738’, ‘F2D99C’, ‘E5B96F’],
‘pear_lemon_fizz’:[’04BFBF’, ‘CAFCD8’, ‘F7E967’, ‘A9CF54’, ‘588F27’],
‘feeling_etsy’:[‘DCEBDD’, ‘A0D5D6’, ‘789AA1’, ‘304345’, ‘AD9A27’],
‘phaedra’:[‘FF6138’, ‘FFFF9D’, ‘BEEB9F’, ’79BD8F’, ’00A388′],

[/groovy]

Visualizing the Themes

In order to see which of these themes might look OK in iTerm I wrote a SwingBuilder script that reads in the script file output from the last step, like so:
[groovy language=”true”]
assert args.size() == 1, ”’The name or path to a file containing a themeMap
script variable must be supplied on the command line”’

def themeMapFileName = args[0]
Binding binding = new Binding()
new GroovyShell(binding).evaluate(new File(themeMapFileName))
assert binding.hasVariable(‘themeMap’), "${args[0]} file must contain a Map variable named themeMap"
def themeMap = binding.themeMap as TreeMap
[/groovy]

The Swing app just has a simple 2 column layout to display the name of the theme on the left and colored labels for each of the theme colors. Looks like this:

[singlepic id=94 w=900 h=450 mode=watermark]

Having worked on Swing apps in plain-Jane Java professionally before, I’m still always astounded at how much less code you can write with Groovy and SwingBuilder. Here’s the 30 lines it takes to do the GUI and here’s the full file on github.

[groovy language=”true”]
def swing = new groovy.swing.SwingBuilder()
def mainPanel = swing.panel() {
boxLayout(axis: javax.swing.BoxLayout.Y_AXIS)
label(text: "Showing ${themeMap.size()} themes")
scrollPane() {
panel() {
boxLayout(axis: javax.swing.BoxLayout.Y_AXIS)
themeMap.each { key, value ->
panel(border: emptyBorder(3)) {
gridLayout(columns: 2, rows: 1)
label(text: key)
value.each {
def color = Color.decode("#" + it)
int colorSize = 50
label(opaque: true, toolTipText: it, background: color, foreground: color,
preferredSize: [colorSize, colorSize] as Dimension,
border: lineBorder(color:Color.WHITE, thickness:1))
}
}
}
}
}
}
def frame = swing.frame(title: ‘Frame’) {
scrollPane(constraints: SwingConstants.CENTER) {
widget(mainPanel)
}
}
frame.pack()
frame.show()
[/groovy]

Creating the iTerm plist Files

The iTerm color presets define some ‘Basic Colors’ and some ‘ANSI Colors’. The basic ones cover: Foreground, Background, Bold, Selection, Selected Text, Cursor and Cursor Text. Seeing as we’ve got seven of these to map to five colors, I’ve(arbitrarily) chosen to make the Cursor and Cursor Text values depend upon the Foreground and Background colors, plus a fixed increment value. Here’s a picture to help explain.

[singlepic id=95 w=750 h=450 mode=watermark]

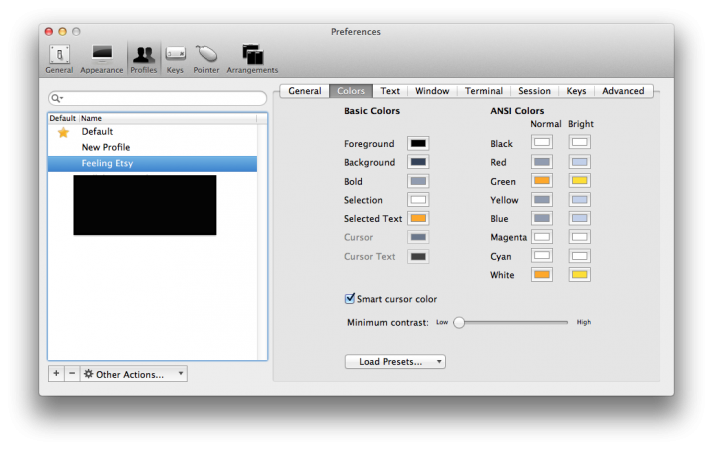
And here is the configuration screen for this new profile in iTerm.

[singlepic id=96 w=750 h=450 mode=watermark]

Each of the ANSI colors maps a standard color onto our color scheme and provides ‘Normal’ and ‘Bright’ variations for each color. I’ve (again arbitrarily) decided to map each of these by randomly selecting a color from the theme and determining a ‘Bright’ version of it. This leads to some themes where colors won’t show up very well if there is a conflict with the ‘Basic’ colors but it’s sufficient for my use case. In the end we want to write out an xml file for each theme which looks something like this:
[xml]
<plist version="1.0">
<dict>
<key>Ansi 0 Color</key>
<dict>
<key>Blue Component</key>
<real>0.2705882353</real>
<key>Green Component</key>
<real>0.2627450980</real>
<key>Red Component</key>
<real>0.1882352941</real>
</dict>
<key>Ansi 8 Color</key>
<dict>

[/xml]

This repeating structure is easy to create using Groovy’s built in xml functionality. Because we want to include the DOCTYPE and xml header, I’m using StreamingMarkupBuilder and it’s handy yieldUnescaped function. Full source code is available on github, but here’s the bit which generates the two ANSI color definitions shown in the xml above.

[groovy language=”true”]
final Closure buildColors = { builder, Color color ->
builder.dict {
key(‘Blue Component’)
real(normalize(color.blue))
key(‘Green Component’)
real(normalize(color.green))
key(‘Red Component’)
real(normalize(color.red))
}
}

final Closure buildComponentColors = { builder, colors, i ->
final hex = colors[random.nextInt(colors.size())]

//Normal
final Color color = extractColor(hex)
builder.key("Ansi $i Color")
buildColors(builder, color)

//Bright
final Color brighterColor = color.brighter()
builder.key("Ansi ${i + 8} Color")
buildColors(builder, brighterColor)
}
[/groovy]

Each theme results in a PLIST xml file ready to import into iTerm.

Conclusion

I continue to be impressed with how easy Groovy makes it to solve common programming problems. Within a very small space of time I was able to:

  • parse multiple RSS feeds
  • create a Swing application to visualize results
  • transform the previously parsed results into an xml document usable in iTerm
  • do it all in a couple of hundred lines of code
  • publish the individual scripts on github

Hopefully this gives you some ideas on how to do some Groovy hacking of your own. I know it was a fun afternoon for me 🙂

27 May, 2012

GitHub Social Graphs with Groovy and GraphViz

Posted by: TheKaptain In: Development

The Goal

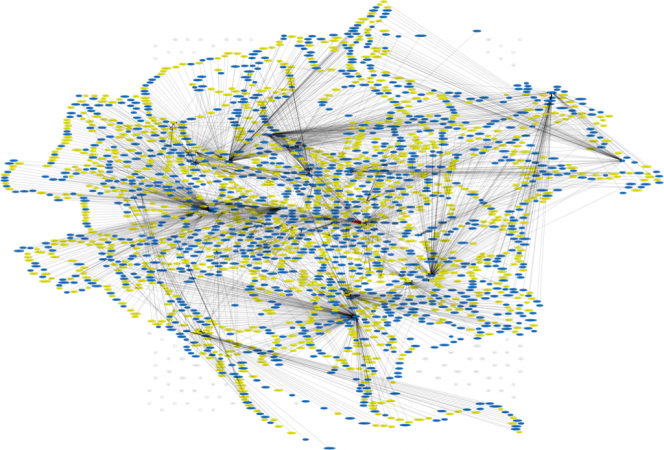
Using the GitHub API, Groovy and GraphViz to determine, interpret and render a graph of the relationships between GitHub users based on the watchers of their repositories. The end result can look something like this.

[singlepic id=81 w=900 h=450 mode=watermark]

The GitHub V3 API

You can find the full documentation for the GitHub V3 API here. They do a great job of documenting the various endpoints and their behaviour as well as demonstrating usage of the API extensively with curl. For the purposes of this post the API calls I’m making are simple GET requests that do not require authentication. In particular I’m targeting two specific endpoints: repositories for a specific user and watchers for a repository.

Limitations of the API

Although a huge upgrade from the 50 requests per hour rate limit on the V2 API, I found it fairly easy to exhaust the 5000 requests per hour provided by the V3 API while gathering data. Fortunately, included with every response from GitHub is a convenient X-RateLimit-Remaining header we can use to check our limit. This allows us to stop processing before we run out of requests, after which GitHub will return errors for every request. For each user we examine one url to find their repositories, and for each of those repositories execute a separate request to find all of the watchers. While executing these requests, using my own GitHub account as the centerpoint, I was able to gather repository information about 1143 users and find 31142 total watchers- 18023 of which were unique in the data collected. This is somewhat of a broken figure as consistently, after reaching the rate limit, there were far more nodes left to process in the queue than already encountered. Myself I only have 31 total repository watchers but appearing within the graph we find users like igrigorik, an employee of Google with 529 repository watchers, and that tends to skew the results somewhat. The end result is that the data provided here is far from complete, I’m sorry to say, but that doesn’t mean it’s not interesting to visualize.

Groovy and HttpBuilder

Groovy and the HttpBuilder dsl abstract away most of the details of handling the HTTP connections. The graph I’m building starts with one central GitHub user and links that user to everyone that is presently watching one of their repositories. This requires a single GET request to load all of the repositories for the given user, and a GET request per repository to find the watchers. These two HTTP operations are very easily encapsulated with Closures using the HttpBuilder wrapper around HttpClient. Each call returns both the X-RateLimit-Remaining value and the requested data. Here’s what the configuration of HttpBuilder looks like:

[groovy language=”true”]
final String rootUrl = ‘https://api.github.com’
final HTTPBuilder builder = new HTTPBuilder(rootUrl)
[/groovy]

The builder object is created and fixed at the GitHub api url, simplifying the syntax for future calls. Now we define two closures, each of which targets a specific url and extracts the appropriate data from the (already automagically unmarshalled by HttpBuilder) JSON response. The findWatchers Closure has a little bit more logic in it to remove duplicate entries, and to exclude the user themselves from the list as by default GitHub records a self-referential link for all users with their own repositories.

[groovy language=”true”]
final String RATE_LIMIT_HEADER = ‘X-RateLimit-Remaining’
final Closure findReposForUser = { HTTPBuilder http, username ->
http.get(path: "/users/$username/repos", contentType: JSON) { resp, json ->
return [resp.headers[RATE_LIMIT_HEADER].value as int, json.toList()]
}
}
final Closure findWatchers = { HTTPBuilder http, username, repo ->
http.get(path: "/repos/$username/$repo/watchers", contentType: JSON) { resp, json ->
return [resp.headers[RATE_LIMIT_HEADER].value as int, json.toList()*.login.flatten().unique() – username]
}
}
[/groovy]

Out of this data we’re only interested (for now) in keeping a simple map of Username -> Watchers which we can easily marshal as a JSON object and store in a file. The complete Groovy script code for loading the data can be run from the command line using the following code or executed remotely from a GitHub gist on the command line by calling groovy https://raw.github.com/gist/2468052/5d536c5a35154defb5614bed78b325eeadbdc1a7/repos.groovy {username}. In either case you should pass in the username you would like to center the graph on. The results will be output to a file called ‘reposOutput.json’ in the working directory. Please be patient, as this is going to take a little while; progress is output to the console as each user is processed so you can follow along.

[groovy language=”true”]
@Grab(‘org.codehaus.groovy.modules.http-builder:http-builder:0.5.2’)
import groovy.json.JsonBuilder
import groovyx.net.http.HTTPBuilder
import static groovyx.net.http.ContentType.JSON

final rootUser = args[0]
final String RATE_LIMIT_HEADER = ‘X-RateLimit-Remaining’
final String rootUrl = ‘https://api.github.com’
final Closure<Boolean> hasWatchers = {it.watchers > 1}
final Closure findReposForUser = { HTTPBuilder http, username ->
http.get(path: "/users/$username/repos", contentType: JSON) { resp, json ->
return [resp.headers[RATE_LIMIT_HEADER].value as int, json.toList()]
}
}
final Closure findWatchers = { HTTPBuilder http, username, repo ->
http.get(path: "/repos/$username/$repo/watchers", contentType: JSON) { resp, json ->
return [resp.headers[RATE_LIMIT_HEADER].value as int, json.toList()*.login.flatten().unique() – username]
}
}

LinkedList nodes = [rootUser] as LinkedList
Map<String, List> usersToRepos = [:]
Map<String, List<String>> watcherMap = [:]
boolean hasRemainingCalls = true
final HTTPBuilder builder = new HTTPBuilder(rootUrl)
while(!nodes.isEmpty() && hasRemainingCalls)
{
String username = nodes.remove()
println "processing $username"
println "remaining nodes = ${nodes.size()}"

def remainingApiCalls, repos, watchers
(remainingApiCalls, repos) = findReposForUser(builder, username)
usersToRepos[username] = repos
hasRemainingCalls = remainingApiCalls > 300
repos.findAll(hasWatchers).each{ repo ->
(remainingApiCalls, watchers) = findWatchers(builder, username, repo.name)
def oldValue = watcherMap.get(username, [] as LinkedHashSet)
oldValue.addAll(watchers)
watcherMap[username] = oldValue
nodes.addAll(watchers)
nodes.removeAll(watcherMap.keySet())
hasRemainingCalls = remainingApiCalls > 300
}
if(!hasRemainingCalls)
{
println "Stopped with $remainingApiCalls api calls left."
println "Still have not processed ${nodes.size()} users."
}
}

new File(‘reposOutput.json’).withWriter {writer ->
writer << new JsonBuilder(watcherMap).toPrettyString()
}
[/groovy]
The JSON file contains very simple data that looks like this:

    "bmuschko": [
        "claymccoy",
        "AskDrCatcher",
        "roycef",
        "btilford",
        "madsloen",
        "phaggood",
        "jpelgrim",
        "mrdanparker",
        "rahimhirani",
        "seymores",
        "AlBaker",
        "david-resnick", ...

Now we need to take this data and turn it into a representation that GraphViz can understand. We’re also going to add information about the number of watchers for each user and a link back to their GitHub page.

Generating a GraphViz file in dot format

GraphViz is a popular framework for generating graphs. The cornerstone of this is a simple format for describing a directed graph in a simple text file(commonly referred to as a ‘dot’ file) combined with a variety of different layouts for displaying the graph. For the purposes of this post, I’m after describing the following for inclusion in the graph:

  • An edge from each watcher to the user whose repository they are watching.
  • A label on each node which includes the user’s name and the count of watchers for all of their repositories.
  • An embedded HTML link to the user’s GitHub page on each node.
  • Highlighting the starting user in the graph by coloring that node red.
  • Assigning a ‘rank’ attribute to nodes that links all users with the same number of watchers.

The script I’m using to create the ‘dot’ file is pretty much just brute force string processing and the full source code is available as a gist, but here are the interesting parts. First, loading in the JSON file that was output in the last step; converting it to a map structure is very simple:
[groovy language=”true”]
def data
new File(filename).withReader {reader ->
data = new JsonSlurper().parse(reader)
}
[/groovy]
From this data structure we can extract particular details and group everything by the number of watchers per user.
[groovy language=”true”]
println "Number of mapped users = ${data.size()}"
println "Number of watchers = ${data.values().flatten().size()}"
println "Number of unique watchers = ${data.values().flatten().unique().size()}"

//group the data by the number of watchers
final Map groupedData = data.groupBy {it.value.size()}.sort {-it.key}
final Set allWatchers = data.collect {it.value}.flatten()
final Set allUsernames = data.keySet()
final Set leafNodes = allWatchers – allUsernames
[/groovy]

Given this data, we create individual nodes with styling details like so:
[groovy language=”true”]
StringWriter writer = new StringWriter()
groupedUsers.each {count, users ->
users.each { username, watchers ->
def user = "\t\"$username\""
def attrs = generateNodeAttrsMemoized(username, count)
def rootAttrs = "fillcolor=red style=filled $attrs"
if (username == rootUser) {
writer << "$user [$rootAttrs];\n"
} else {
writer << "$user [$attrs ${extraAttrsMemoized(count, username)}];\n"
}
}
}
[/groovy]
And this generates node and edge descriptions that look like this:

     ...
     	"gyurisc" [label="gyurisc = 31" URL="https://github.com/gyurisc" ];
	"kellyrob99" [fillcolor=red style=filled label="kellyrob99 = 31" 
                      URL="https://github.com/kellyrob99"];
     ...
	"JulianDevilleSmith" -> "cfxram";
	"rhyolight" -> "aalmiray";
	"kellyrob99" -> "aalmiray";
     ...

If you created the JSON data already, you can run this command in the same directory in order to generate the GraphViz dot file: groovy https://raw.github.com/gist/2475460/78642d81dd9bc95f099e0f96c3d87389a1ef6967/githubWatcherDigraphGenerator.groovy {username} reposOutput.json. This will create a file named ‘reposDigraph.dot’ in that directory. From there the last step is to interpret the graph definition into an image.

Turning a ‘dot’ file into an image

I was looking for a quick and easy way to generate multiple visualizations from the same model quickly for comparison and settled on using GPars to generate them concurrently. We have to be a little careful here as some of the layout/format combinations can require a fair bit of memory and CPU – in the worst cases as much as 2GB of memory and processing times in the range of an hour. My recommendation is to stick with the sfdp and twopi(see the online documentation here) layouts for graphs of similar size to the one described here. If you’re after a huge, stunning graphic with complete detail, expect a png image to weigh in somewhere north of 150MB whereas the corresponding svg file will be less than 10MB. This Groovy script depends on having the GraphViz command line ‘dot’ executable already installed, exercises six of the available layout algorithms and generates png and svn files using four concurrently.

[groovy language=”true”]
import groovyx.gpars.GParsPool

def inputfile = args[0]
def layouts = [ ‘dot’, ‘neato’, ‘twopi’, ‘sfdp’, ‘osage’, ‘circo’ ] //NOTE some of these will fail to process large graphs
def formats = [ ‘png’, ‘svg’]
def combinations = [layouts, formats].combinations()

GParsPool.withPool(4) {
combinations.eachParallel { combination ->
String layout = combination[0]
String format = combination[1]
List args = [ ‘/usr/local/bin/dot’, "-K$layout", ‘-Goverlap=prism’, ‘-Goverlap_scaling=-10’, "-T$format",
‘-o’, "${inputfile}.${layout}.$format", inputfile ]
println args
final Process execute = args.execute()
execute.waitFor()
println execute.exitValue()
}
}

[/groovy]
Here’s a gallery with some examples of the images created and scaled down to be web friendly. The full size graphs I generated using this data weighed in as large as 300MB for a single PNG file. The SVG format takes up significantly less space but still more than 10MB. I also had trouble finding a viewer for the SVG format that was a) capable of showing the large graph in a navigable way and b) didn’t crash my browser due to memory usage.
[nggallery id=16]

And just for fun 🙂

Originally I had intended to publish this functionality as an application on the Google App Engine using Gaelyk, but since the API limit would make it suitable for pretty much one request per hour, and likely get me in trouble with GitHub, I ended up foregoing that bit. But along the way I developed a very simple page that will load all of the publicly available Gists for a particular user and display them in a table. This is a pretty clean example of how you can whip up a quick and dirty application and make it publicly available using GAE + Gaelyk. This involved setting up the infrastructure using the gradle-gaelyk-plugin combined with the gradle-gae-plugin, and using Gradle to build, test and deploy the app to the web- all told about an hour’s worth of effort. Try this link to load up all of my publicly available Gists- replace the username parameter if you’d like to check out somebody else. Please give it a second as GAE will undeploy the application if it hasn’t been requested in awhile, so the first call can take a few seconds.
http://publicgists.appspot.com/gist?username=kellyrob99

Here’s the Groovlet implementation that loads the data and then forwards to the template page.
[groovy language=”true”]
def username = request.getParameter(‘username’) ?: ‘kellyrob99’
def text = "https://gist.github.com/api/v1/json/gists/$username".toURL().text
log.info text
request.setAttribute(‘rawJSON’, text)
request.setAttribute(‘username’, username)

forward ‘/WEB-INF/pages/gist.gtpl’
[/groovy]

And the accompanying template page which renders a simple tabular view of the API request.
[groovy language=”true”]
<% include ‘/WEB-INF/includes/header.gtpl’ %>
<% import groovy.json.JsonSlurper %>
<%
def gistMap = new JsonSlurper().parseText(request[‘rawJSON’])
%>
<h1>Public Gists for username : ${request[‘username’]} </h1>

<p>
<table class = "gridtable">
<th>Description</th>
<th>Web page</th>
<th>Repo</th>
<th>Owner</th>
<th>Files</th>
<th>Created at</th>
<%
gistMap.gists.each { data ->
def repo = data.repo
%>
<tr>
<td>${data.description ?: ”}</td>
<td>
<a href="https://gist.github.com/${repo}">${repo}</a>
</td>
<td>
<a href= "git://gist.github.com/${repo}.git">${repo}</a>
</td>
<td>${data.owner}</td>
<td>${data.files}</td>
<td>${data.created_at}</td>
</tr>
<% } %>
</table>
</p>
<% include ‘/WEB-INF/includes/footer.gtpl’ %>
[/groovy]

18 Mar, 2012

JFreeChart with Groovy and Apache POI

Posted by: TheKaptain In: Development

The point of this article is to show you how to parse data from an Excel spreadsheet that looks like this:

[singlepic id=78 w=700 h=400 mode=watermark]

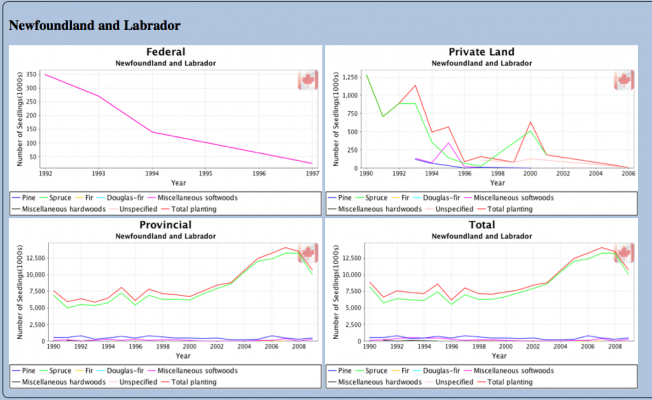
and turn it into a series of graphs that look like this:

[singlepic id=79 w=700 h=400 mode=watermark]

Recently I was looking for an opportunity to get some practice with JFreeChart and ended up looking at a dataset released by the Canadian government as part of their ‘Open Data’ initiative.

The particular set of data is entitled ‘Number of Seedlings Planted by Ownership, Species’ and is delivered as an Excel spreadsheet, hence the need for the Apache POI library in order to read the data in. As is fairly usual, at least in my experience, the Excel spreadsheet is designed primarily for human consumption which adds a degree of complexity to the parsing. Fortunately the spreadsheet does follow a repetitive pattern that can be accounted for fairly easily, so this is not insurmountable. Still, we want to get the data out of Excel to make it more approachable for machine consumption so the first step is to convert it to a JSON representation. Once it is in this much more transportable form we can readily convert the data into graph visualizations using JFreeChart.

The spreadsheet format

Excel as a workplace tool is very well established, can increase individual productivity and is definitely a boon to your average office worker. The problem is that once the data is there it’s often trapped there. Data tends to be laid out based on human aesthetics and not on parsability, meaning that unless you want to use Excel itself to do further analysis, there’s not a lot of options. Exports to more neutral formats like csv suffer from the same problems- namely that there’s no way to read in the data coherently without designing a custom parser. In this particular case, parsing the spreadsheet has to take into account the following:

  • Merged cells where one column is meant to represent a fixed value for a number of sequential rows.
  • Column headers that do not represent all of the actual columns. Here we have a ‘notes’ column for each province that immediately follows its’ data column. As the header cells are merged across both of these columns, they cannot be used directly to parse the data.
  • Data is broken down into several domains that lead to repetitions in the format.
  • The data contains a mix of numbers where results are available and text where they are not. The meanings of the text entries are described in a table at the end of the spreadsheet.
  • Section titles and headers are repeated throughout the document, apparently trying to match some print layout, or perhaps just trying to provide some assistance to those scrolling through the long document.

Data in the spreadsheet is first divided into reporting by Provincial crown land, private land, Federal land, and finally a total for all of them.

Within each of these sections, data is reported for each tree species on a yearly basis across all Provinces and Territories along with aggregate totals of these figures across Canada.

Each of these species data-tables has an identical row/column structure which allows us to create a single parsing structure sufficient for reading in data from each of them separately.

Converting the spreadsheet to JSON

For parsing the Excel document, I’m using the Apache POI library and a Groovy wrapper class to assist in processing. The wrapper class is very simple but allows us to abstract most of the mechanics of dealing with the Excel document away. The full source is available on this blog post from author Goran Ehrsson. The key benefit is the ability to specify a window of the file to process based on ‘offset’ and ‘max’ parameters provided in a simple map. Here’s an example for reading data for the text symbols table at the end of the spreadsheet.

We define a Map which states which sheet to read from, which line to start on(offset) and how many lines to process. The ExcelBuilder class(which isn’t really a builder at all) takes in the path to a File object and under the hood reads that into a POI HSSFWorkbook which is then referenced by the call to the eachLine method.

[groovy language=”language="true”]
public static final Map SYMBOLS = [sheet: SHEET1, offset: 910, max: 8]

final ExcelBuilder excelReader = new ExcelBuilder(data.absolutePath)
Map<String, String> symbolTable = [:]
excelReader.eachLine(SYMBOLS) { HSSFRow row ->
symbolTable[row.getCell(0).stringCellValue] = row.getCell(1).stringCellValue
}

[/groovy]

Eventually when we turn this into JSON, it will look like this:

[plain language=”true”]
"Symbols": {
"…": "Figures not appropriate or not applicable",
"..": "Figures not available",
"–": "Amount too small to be expressed",
"-": "Nil or zero",
"p": "Preliminary figures",
"r": "Revised figures",
"e": "Estimated by provincial or territorial forestry agency",
"E": "Estimated by the Canadian Forest Service or by Statistics Canada"
}
[/plain]

Now processing the other data blocks gets a little bit trickier. The first column consists of 2 merged cells, and all but one of the other headers actually represents two columns of information: a count and an optional notation. The merged column is handled by a simple EMPTY placeholder and the extra columns by processing the list of headers;.

[groovy language=”language="true”]
public static final List<String> HEADERS = [‘Species’, ‘EMPTY’, ‘Year’, ‘NL’, ‘PE’, ‘NS’, ‘NB’, ‘QC’, ‘ON’, ‘MB’, ‘SK’, ‘AB’,
‘BC’, ‘YT’, ‘NT *a’, ‘NU’, ‘CA’]
/**
* For each header add a second following header for a ‘notes’ column
* @param strings
* @return expanded list of headers
*/
private List<String> expandHeaders(List<String> strings)
{
strings.collect {[it, "${it}_notes"]}.flatten()
}
[/groovy]
Each data block corresponds to a particular species of tree, broken down by year and Province or Territory. Each species is represented by a map which defines where in the document that information is contained so we can iterate over a collection of these maps and aggregate data quite easily. This set of constants and code is sufficient for parsing all of the data in the document.
[groovy language=”language="true”]
public static final int HEADER_OFFSET = 3
public static final int YEARS = 21
public static final Map PINE = [sheet: SHEET1, offset: 6, max: YEARS, species: ‘Pine’]
public static final Map SPRUCE = [sheet: SHEET1, offset: 29, max: YEARS, species: ‘Spruce’]
public static final Map FIR = [sheet: SHEET1, offset: 61, max: YEARS, species: ‘Fir’]
public static final Map DOUGLAS_FIR = [sheet: SHEET1, offset: 84, max: YEARS, species: ‘Douglas-fir’]
public static final Map MISCELLANEOUS_SOFTWOODS = [sheet: SHEET1, offset: 116, max: YEARS, species: ‘Miscellaneous softwoods’]
public static final Map MISCELLANEOUS_HARDWOODS = [sheet: SHEET1, offset: 139, max: YEARS, species: ‘Miscellaneous hardwoods’]
public static final Map UNSPECIFIED = [sheet: SHEET1, offset: 171, max: YEARS, species: ‘Unspecified’]
public static final Map TOTAL_PLANTING = [sheet: SHEET1, offset: 194, max: YEARS, species: ‘Total planting’]
public static final List<Map> PROVINCIAL = [PINE, SPRUCE, FIR, DOUGLAS_FIR, MISCELLANEOUS_SOFTWOODS, MISCELLANEOUS_HARDWOODS, UNSPECIFIED, TOTAL_PLANTING]
public static final List<String> AREAS = HEADERS[HEADER_OFFSET..-1]

final Closure collector = { Map species ->
Map speciesMap = [name: species.species]
excelReader.eachLine(species) {HSSFRow row ->
//ensure that we are reading from the correct place in the file
if (row.rowNum == species.offset)
{
assert row.getCell(0).stringCellValue == species.species
}
//process rows
if (row.rowNum > species.offset)
{
final int year = row.getCell(HEADERS.indexOf(‘Year’)).stringCellValue as int
Map yearMap = [:]
expandHeaders(AREAS).eachWithIndex {String header, int index ->
final HSSFCell cell = row.getCell(index + HEADER_OFFSET)
yearMap[header] = cell.cellType == HSSFCell.CELL_TYPE_STRING ? cell.stringCellValue : cell.numericCellValue
}
speciesMap[year] = yearMap.asImmutable()
}
}
speciesMap.asImmutable()
}
[/groovy]

The defined collector Closure returns a map of all species data for one of the four groupings(Provincial, private land, Federal and totals). The only thing that differentiates these groups is their offset in the file so we can define maps for the structure of each simply by updating the offsets of the first.

[groovy language=”true”]
public static final List<Map> PROVINCIAL = [PINE, SPRUCE, FIR, DOUGLAS_FIR, MISCELLANEOUS_SOFTWOODS, MISCELLANEOUS_HARDWOODS, UNSPECIFIED, TOTAL_PLANTING]
public static final List<Map> PRIVATE_LAND = offset(PROVINCIAL, 220)
public static final List<Map> FEDERAL = offset(PROVINCIAL, 441)
public static final List<Map> TOTAL = offset(PROVINCIAL, 662)

private static List<Map> offset(List<Map> maps, int offset)
{
maps.collect { Map map ->
Map offsetMap = new LinkedHashMap(map)
offsetMap.offset = offsetMap.offset + offset
offsetMap
}
}
[/groovy]

Finally, we can iterate over these simple map structures applying the collector Closure and we end up with a single map representing all of the data.

[groovy language=”true”]
def parsedSpreadsheet = [PROVINCIAL, PRIVATE_LAND, FEDERAL, TOTAL].collect {
it.collect(collector)
}
Map resultsMap = [:]
GROUPINGS.eachWithIndex {String groupName, int index ->
resultsMap[groupName] = parsedSpreadsheet[index]
}
resultsMap[‘Symbols’] = symbolTable
[/groovy]

And the JsonBuilder class provides an easy way to convert any map to a JSON document ready to write out the results.

[groovy language=”true”]
Map map = new NaturalResourcesCanadaExcelParser().convertToMap(data)
new File(‘src/test/resources/NaturalResourcesCanadaNewSeedlings.json’).withWriter {Writer writer ->
writer << new JsonBuilder(map).toPrettyString()
}
[/groovy]

Parsing JSON into JFreeChart line charts

All right, so now that we’ve turned the data into a slightly more consumable format, it’s time to visualize it. For this case I’m using a combination of the JFreeChart library and the GroovyChart project which provides a nice DSL syntax for working with the JFreeChart API. It doesn’t look to be under development presently, but aside from the fact that the jar isn’t published to an available repository it was totally up to this task.

We’re going to create four charts for each of the fourteen areas represented for a total of 56 graphs overall. All of these graphs contain plotlines for each of the eight tree species tracked. This means that overall we need to create 448 distinct time series. I didn’t do any formal timings of how long this takes, but in general it came in somewhere under ten seconds to generate all of these. Just for fun, I added GPars to the mix to parallelize creation of the charts, but since writing the images to disk is going to be the most expensive part of this process, I don’t imagine it’s speeding things up terribly much.

First, reading in the JSON data from a file is simple with JsonSlurper.

[groovy language=”true”]
def data
new File(jsonFilename).withReader {Reader reader ->
data = new JsonSlurper().parse(reader)
}
assert data
[/groovy]

Here’s a sample of what the JSON data looks like for one species over a single year, broken down first by one of the four major groups, then by tree species, then by year and finally by Province or Territory.

[plain language=”true”]
{
"Provincial": [
{
"name": "Pine",
"1990": {
"NL": 583.0,
"NL_notes": "",
"PE": 52.0,
"PE_notes": "",
"NS": 4.0,
"NS_notes": "",
"NB": 4715.0,
"NB_notes": "",
"QC": 33422.0,
"QC_notes": "",
"ON": 51062.0,
"ON_notes": "",
"MB": 2985.0,
"MB_notes": "",
"SK": 4671.0,
"SK_notes": "",
"AB": 8130.0,
"AB_notes": "",
"BC": 89167.0,
"BC_notes": "e",
"YT": "-",
"YT_notes": "",
"NT *a": 15.0,
"NT *a_notes": "",
"NU": "..",
"NU_notes": "",
"CA": 194806.0,
"CA_notes": "e"
},

[/plain]

Building the charts is a simple matter of iterating over the resulting map of parsed data. In this case we’re ignoring the ‘notes’ data but have included it in the dataset in case we want to use it later. We’re also just ignoring any non-numeric values.

[groovy language=”true”]
GROUPINGS.each { group ->
withPool {
AREAS.eachParallel { area ->
ChartBuilder builder = new ChartBuilder();
String title = sanitizeName("$group-$area")
TimeseriesChart chart = builder.timeserieschart(title: group,
timeAxisLabel: ‘Year’,
valueAxisLabel: ‘Number of Seedlings(1000s)’,
legend: true,
tooltips: false,
urls: false
) {
timeSeriesCollection {
data."$group".each { species ->
Set years = (species.keySet() – ‘name’).collect {it as int}
timeSeries(name: species.name, timePeriodClass: ‘org.jfree.data.time.Year’) {
years.sort().each { year ->
final value = species."$year"."$area"
//check that it’s a numeric value
if (!(value instanceof String))
{
add(period: new Year(year), value: value)
}
}
}
}
}
}

}
[/groovy]

Then we apply some additional formatting to the JFreeChart to enhance the output styling, insert an image into the background, and fix the plot color schemes.

[groovy language=”true”]
JFreeChart innerChart = chart.chart
String longName = PROVINCE_SHORT_FORM_MAPPINGS.find {it.value == area}.key
innerChart.addSubtitle(new TextTitle(longName))
innerChart.setBackgroundPaint(Color.white)
innerChart.plot.setBackgroundPaint(Color.lightGray.brighter())
innerChart.plot.setBackgroundImageAlignment(Align.TOP_RIGHT)
innerChart.plot.setBackgroundImage(logo)
[Color.BLUE, Color.GREEN, Color.ORANGE, Color.CYAN, Color.MAGENTA, Color.BLACK, Color.PINK, Color.RED].eachWithIndex { color, int index ->
innerChart.XYPlot.renderer.setSeriesPaint(index, color)
}
[/groovy]

And we write out each of the charts to a formulaically named png file.

[groovy language=”true”]
def fileTitle = "$FILE_PREFIX-${title}.png"
File outputDir = new File(outputDirectory)
if (!outputDir.exists())
{
outputDir.mkdirs()
}
File file = new File(outputDir, fileTitle)
if (file.exists())
{
file.delete()
}
ChartUtilities.saveChartAsPNG(file, innerChart, 550, 300)
[/groovy]

To tie it all together, an html page is created using MarkupBuilder to showcase all of the results, organized by Province or Territory.

[groovy language=”true”]
def buildHtml(inputDirectory)
{
File inputDir = new File(inputDirectory)
assert inputDir.exists()
Writer writer = new StringWriter()
MarkupBuilder builder = new MarkupBuilder(writer)
builder.html {
head {
title(‘Number of Seedlings Planted by Ownership, Species’)
style(type: "text/css") {
mkp.yield(CSS)
}
}
body {
ul {
AREAS.each { area ->
String areaName = sanitizeName(area)
div(class: ‘area rounded-corners’, id: areaName) {
h2(PROVINCE_SHORT_FORM_MAPPINGS.find {it.value == area}.key)
inputDir.eachFileMatch(~/.*$areaName\.png/) {
img(src: it.name)
}
}
}
}
script(type: ‘text/javascript’, src: ‘https://ajax.googleapis.com/ajax/libs/jquery/1.7.1/jquery.min.js’, ”)
script(type: ‘text/javascript’) {
mkp.yield(JQUERY_FUNCTION)
}
}
}
writer.toString()
}
[/groovy]

The generated html page assumes that all images are co-located in the same folder, presents four images per Province/Territory and, just for fun, uses JQuery to attach a click handler to each of the headers. Click on a header and the images in that div will animate into the background. I’m sure the actual JQuery being used could be improved upon, but it serves its purpose. Here’s a sample of the html output:

[xml language=”true”]
<ul>
<div class=’area rounded-corners’ id=’NL’>
<h2>Newfoundland and Labrador</h2>
<img src=’naturalResourcesCanadaNewSeedlings-Federal-NL.png’ />
<img src=’naturalResourcesCanadaNewSeedlings-PrivateLand-NL.png’ />
<img src=’naturalResourcesCanadaNewSeedlings-Provincial-NL.png’ />
<img src=’naturalResourcesCanadaNewSeedlings-Total-NL.png’ />
</div>

[/xml]

The resulting page looks like this in Firefox.

[singlepic id=80 w=700 h=400 mode=watermark]

Source code and Links

The source code is available on GitHub. So is the final resulting html page. The entire source required to go from Excel to charts embedded in an html page comes in at slightly under 300 lines of code and I don’t think the results are too bad for the couple of hours effort involved. Finally, the JSON results are also hosted on the GitHub pages for the project for anyone else who might want to delve into the data.

Some reading related to this topic:

[nggallery id=15]

26 Feb, 2012

Hooking into the Jenkins(Hudson) API, Part 2

Posted by: TheKaptain In: Development

It’s been almost a year, but I finally had some time to revisit some code I wrote for interacting with the Jenkins api. I’ve used parts of this work to help manage a number of Jenkins build servers, mostly in terms of keeping plugins in sync and moving jobs from one machine to another. For this article I’m going to be primarily focusing on the CLI jar functionality and some of the things you can do with it. This has mostly been developed against Jenkins but I did some light testing with Hudson and it worked there for everything I tried, so the code remains mostly agnostic as to your choice of build server.

The project structure

The code is hosted on Github, and provides a Gradle build which downloads and launches a Jenkins(or Hudson) server locally to execute tests. The server is set to use the Gradle build directory as its working directory, so it can be deleted simply by executing gradle clean. I tried it using both the Jenkins and the Hudson versions of the required libraries and, aside from some quirks between the two CLI implementations, they continue to function very much the same. If you want to try it with Hudson instead of Jenkins, pass in the command flag -Pswitch and the appropriate war and libraries will be used. The project is meant to be run with Gradle 1.0-milestone-8, and comes with a Gradle wrapper for that version. Most of the code remains the same since the original article, but there are some enhancements and changes to deal with the newer versions of Jenkins and Hudson.
The library produced by this project is published as a Maven artifact, and later on I’ll describe exactly how to get at it. There are also some samples included that demonstrate using that library in Gradle or Maven projects, and in Groovy scripts with Grapes. We’re using Groovy 1.8.6, Gradle 1.0-milestone-8 and Maven 3.0.3 to build everything.

Getting more out of the CLI

As an alternative to the api, the CLI jar is a very capable way of interacting with the build server. In addition to a variety of built-in commands, Groovy scripts can be executed remotely, and with a little effort we can easily serialize responses in order to work with data extracted on the server. As an execution environment, the server provides a Groovysh shell and stocks it with imports for the hudson.model package. Also passed into the Binding is the instance of the Jenkins/Hudson singleton object in that package. In these examples I’m using the backwards-compatible Hudson version, since the code is intended to be runnable on either flavor of the server.

The available commands

There’s a rich variety of built-in commands, all of which are implemented in the hudson.cli package. Here are the ones that are listed on the CLI page of the running application:

  • build: Builds a job, and optionally waits until its completion.
  • cancel-quiet-down: Cancel the effect of the “quiet-down” command.
  • clear-queue: Clears the build queue
  • connect-node: Reconnect to a node
  • copy-job: Copies a job.
  • create-job: Creates a new job by reading stdin as a configuration XML file.
  • delete-builds: Deletes build record(s).
  • delete-job: Deletes a job
  • delete-node: Deletes a node
  • disable-job: Disables a job
  • disconnect-node: Disconnects from a node
  • enable-job: Enables a job
  • get-job: Dumps the job definition XML to stdout
  • groovy: Executes the specified Groovy script.
  • groovysh: Runs an interactive groovy shell.
  • help: Lists all the available commands.
  • install-plugin: Installs a plugin either from a file, an URL, or from update center.
  • install-tool: Performs automatic tool installation, and print its location to stdout. Can be only called from
    inside a build.
  • keep-build: Mark the build to keep the build forever.
  • list-changes: Dumps the changelog for the specified build(s).
  • login: Saves the current credential to allow future commands to run without explicit credential information.
  • logout: Deletes the credential stored with the login command.
  • mail: Reads stdin and sends that out as an e-mail.
  • offline-node: Stop using a node for performing builds temporarily, until the next “online-node” command.
  • online-node: Resume using a node for performing builds, to cancel out the earlier “offline-node” command.
  • quiet-down: Quiet down Jenkins, in preparation for a restart. Don’t start any builds.
  • reload-configuration: Discard all the loaded data in memory and reload everything from file system. Useful when
    you modified config files directly on disk.
  • restart: Restart Jenkins
  • safe-restart: Safely restart Jenkins
  • safe-shutdown: Puts Jenkins into the quiet mode, wait for existing builds to be completed, and then shut down
    Jenkins.
  • set-build-description: Sets the description of a build.
  • set-build-display-name: Sets the displayName of a build
  • set-build-result: Sets the result of the current build. Works only if invoked from within a build.
  • shutdown: Immediately shuts down Jenkins server
  • update-job: Updates the job definition XML from stdin. The opposite of the get-job command
  • version: Outputs the current version.
  • wait-node-offline: Wait for a node to become offline
  • wait-node-online: Wait for a node to become online
  • who-am-i: Reports your credential and permissions

It’s not immediately apparent what arguments are required for each, but they almost universally follow a CLI pattern of printing usage details when called with no arguments. For instance, when you call the build command with no arguments, here’s what you get back in the error stream:

Argument “JOB” is required
java -jar jenkins-cli.jar build args…
Starts a build, and optionally waits for a completion.
Aside from general scripting use, this command can be
used to invoke another job from within a build of one job.
With the -s option, this command changes the exit code based on
the outcome of the build (exit code 0 indicates a success.)
With the -c option, a build will only run if there has been
an SCM change
JOB : Name of the job to build
-c : Check for SCM changes before starting the build, and if there’s no
change, exit without doing a build
-p : Specify the build parameters in the key=value format.
-s : Wait until the completion/abortion of the command

Getting data out of the system

All of the interaction with the remote system is handled by streams and it’s pretty easy to craft scripts that will return data in an easily parseable String format using built-in Groovy facilities. In theory, you should be able to marshal more complex objects as well, but let’s keep it simple for now. Here’s a Groovy script that just extracts all of the job names into a List, calling the Groovy inspect method to quote all values.

Once we get the response back, we do a little housekeeping to remove some extraneous characters at the beginning of the String, and use Eval.me to transform the String into a List. Groovy provides a variety of ways of turning text into code, so if your usage scenario gets more complicated than this simple case you can use a GroovyShell with a Binding or other alternative to parse the results into something useful. This easy technique extends to Maps and other types as well, making it simple to work with data sent back from the server.

Some useful examples

Finding plugins with updates and and updating all of them

Here’s an example of using a Groovy script to find all of the plugins that have updates available, returning that result to the caller, and then calling the CLI ‘install-plugin’ command on all of them. Conveniently, this command will either install a plugin if it’s not already there or update it to the latest version if already installed.

Install or upgrade a suite of Plugins all at once

This definitely beats using the ‘Manage Plugins’ UI and is idempotent so running it more than once can only result in possibly upgrading already installed Plugins. This set of plugins might be overkill, but these are some plugins I recently surveyed for possible use.

Finding all failed builds and triggering them

It’s not all that uncommon that a network problem or infrastructure event can cause a host of builds to fail all at once. Once the problem is solved this script can be useful for verifying that the builds are all in working order.

Open an interactive Groovy shell

If you really want to poke at the server you can launch an interactive shell to inspect state and execute commands. The System.in stream is bound and responses from the server are immediately echoed back.

Updates to the project

A lot has happened in the last year and all of the project dependencies needed an update. In particular, there have been some very nice improvements to Groovy, Gradle and Spock. Most notably, Gradle has come a VERY long way since version 0.9.2. The JSON support added in Groovy 1.8 comes in handy as well. Spock required a small tweak for rendering dynamic content in test reports when using @Unroll, but that’s a small price to pay for features like the ‘old’ method and Chained Stubbing. Essentially, in response to changes in Groovy 1.8+, a Spock @Unroll annotation needs to change from:
[groovy language=”true”]
@Unroll("querying of #rootUrl should match #xmlResponse")
[/groovy]

to a Closure encapsulated GString expression:

[groovy language=”true”]
@Unroll({"querying of $rootUrl should match $xmlResponse"})
[/groovy]
It sounds like the syntax is still in flux and I’m glad I found this discussion of the problem online.

Hosting a Maven repository on Github

Perhaps you noticed from the previous script examples, we’re referencing a published library to get at the HudsonCliApi class. I read an interesting article last week which describes how to use the built-in Github Pages for publishing a Maven repository. While this isn’t nearly as capable as a repository like Nexus or Artifactory, it’s totally sufficient for making some binaries available to most common build tools in a standard fashion. Simply publish the binaries along with associated poms in the standard Maven repo layout and you’re off to the races! Each dependency management system has its quirks(I’m looking at you Ivy!) but they’re pretty easy to work around, so here’s examples for Gradle, Maven and Groovy Grapes to use the library produced by this project code. Note that some of the required dependencies for Jenkins/Hudson aren’t available in the Maven central repository, so we’re getting them from the Glassfish repo.

Gradle

Pretty straight forward, this works with the latest version of Gradle and assumes that you are using the Groovy plugin.
[groovy language=”language=true”]
repositories {
mavenCentral()
maven {
url ‘http://maven.glassfish.org/content/groups/public/’
}
maven {
url ‘http://kellyrob99.github.com/Jenkins-api-tour/repository’
}
}
dependencies {
groovy "org.codehaus.groovy:groovy-all:${versions.groovy}"
compile ‘org.kar:hudson-api:0.2-SNAPSHOT’
}
[/groovy]

Maven

Essentially the same content in xml and in this case it’s assumed that you’re using the GMaven plugin
[xml language=”language="true”]
<repositories>
<repository>
<id>glassfish</id>
<name>glassfish</name>
<url>http://maven.glassfish.org/content/groups/public/</url>
</repository>
<repository>
<id>github</id>
<name>Jenkins-api-tour maven repo on github</name>
<url>http://kellyrob99.github.com/Jenkins-api-tour/repository</url>
</repository>
</repositories>

<dependencies>
<dependency>
<groupId>org.codehaus.groovy</groupId>
<artifactId>groovy-all</artifactId>
<version>${groovy.version}</version>
</dependency>
<dependency>
<groupId>org.kar</groupId>
<artifactId>hudson-api</artifactId>
<version>0.2-SNAPSHOT</version>
</dependency>
</dependencies>

[/xml]

Grapes

In this case there seems to be a problem resolving some transitive dependency for an older version of Groovy which is why there’s an explicit exclude for it.
[groovy language=”language="true”]
@GrabResolver(name=’glassfish’, root=’http://maven.glassfish.org/content/groups/public/’)
@GrabResolver(name="github", root="http://kellyrob99.github.com/Jenkins-api-tour/repository")
@Grab(‘org.kar:hudson-api:0.2-SNAPSHOT’)
@GrabExclude(‘org.codehaus.groovy:groovy’)
[/groovy]

Links

The Github Jenkins-api-tour project page
Maven repositories on Github
Scriptler example Groovy scripts
Jenkins CLI documentation